Hi Kogs,
I tried editing the earlier post twice. but don't know why. it's not taking.
I just recollected what UFO said
Kumar,
Just finish the two pairs left...
Means, I need not think too much of it
So going ahead rewinding the same way. but with some more extra paper in order not to short 25 SWG - 18 mts - nearly 2 ohm res as meter reads.
Once again thanks a lot Kogs for the support.
Regards and Namaste
Kumar
Announcement
Collapse
No announcement yet.
My Asymmetric Electrodynamic Machines
Collapse
X
-
Winding and Res
Originally posted by iankoglin View PostG'day Kumar
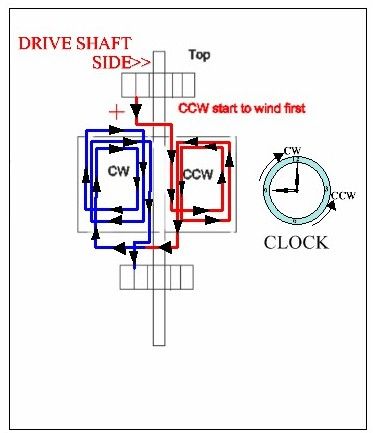
Please look at this UFO drawing of how an Asymmetric armature should be wound The Top is looking from the drive end into the motor and it is here that the Positive Battery is connected through the Brush
Make sure you start from the Top first and do the CCW first
As you will have probably noticed that in the last few posts UFO has stated he does not deduct the Internal resistance of the DMM ,when he measures the Ohm reading of a pair of Coils
Please check your windings to make sure you do understand the direction of the wiring and that your winding is in fact wound in reverse even so as UFO said just reverse the polarity at the battery to the motor only (Not just reverse the battery terminals if the current goes through a controller as you might blow the controller)
Also Kumar try winding some elastic medical sticking plaster around where the wire touches the fingers when you pull the wires tight.
Kindest Regards
Kogs does not rewinding either.
Namaste.
Thanks a lot for the directions given. Will take that plaster immediately Kogs.
And I need to redo the winding as I understood I shorted two coils with the armature core . Pair 3 and Pair 13 shorted. I took necessary care to avoid this situation by keeping the poly paper sheet that the professional winders keep. I kept on checking the poles till I completed ten pairs winding. Till then it was very much alright.
Later my focus moved to the quantity of wire available as I understood I was running short of coil. Ignored to check the continuity. But till that time Pair3 also was normal Kogs. I completed 13 pairs last night, ran out of wire. This afternoon I wound the balance two and then remembered that i didn't check continuity from pair 11. At that time I started checking form pair 1. I found pair 3 and pair 13 shorted with the body. This bloody metallic armature cores turned out to be a big demon, to fight with, before getting the angel in.
When I make the UFO machine from scratch, I'll see that the core will be either fiber, teflon or at least wood
But this is an opportunity now to keep the pair orientation in correct order (cw and ccw) as UFO designed.
And Kogs, regarding the pair resistance, I too read what UFO was telling. He didn't look into the internal res. Then how come to go ahead with the resistance? In fact this time I took care that res per pair maintained at 2 ohms incl internal res of .4 ohms. Now what should I do? Shall I reduce the wire length so that I get only 1 ohm incl meter resistance? How do we know the internal res of UFO's ohm meter? I got two meters, both are showing two different internal res
Earlier when I tried feeding the 230v 4 amps rated currant into the rewound motor (of course I wrongly rewound, but even then I maintained the number of turns, gauge etc as manufacturer did ), i found smoke from the rotor. I stopped feeding that voltage and currant to armature. This time I increased the wire length ( and thus the no. of turns) and also the res. hoping that I could run it on 230 v 4 amp.
Now what should I do Kogs? Shall I go ahead or shall I reduce the length in such a way it comes to 1 ohm including the internal res of meter?
Thanks and regards
Kumar
on his way to pharmacy to get band-aid
(copycat to Kogs in these expressions)
Kogs, my son is asking me to keep your gear wheels( that you keep at the end of your posting before posting your mood) into my posts as well
Leave a comment:
-
Originally posted by ajaya999 View PostOhhh. I just noticed I did the winding in just opposite.
UFO drawing says ccw on rhs and cw on lhs
I just did it in reverse - all 13 pairs...
wtd... shall i continue - again only to understand it doesn't work
perhaps the swelling in my fingers go eternal
Hey sir, wtd. continue or unwind and redo?
kumar
looking at his swollen fingers...
(kogs style imitator )
Please look at this UFO drawing of how an Asymmetric armature should be wound The Top is looking from the drive end into the motor and it is here that the Positive Battery is connected through the Brush
Make sure you start from the Top first and do the CCW first
As you will have probably noticed that in the last few posts UFO has stated he does not deduct the Internal resistance of the DMM ,when he measures the Ohm reading of a pair of Coils
Please check your windings to make sure you do understand the direction of the wiring and that your winding is in fact wound in reverse even so as UFO said just reverse the polarity at the battery to the motor only (Not just reverse the battery terminals if the current goes through a controller as you might blow the controller)
Also Kumar try winding some elastic medical sticking plaster around where the wire touches the fingers when you pull the wires tight.
Kindest Regards
Kogs does not rewinding either.
Leave a comment:
-
Asymmetrical 10 Pole Motor Video
Asymmetrical 10 Pole Motor Video. Still figuring out how to get the video to play on the page.
^ This is the new link to the video that now works...
[IMG][/IMG]
This is all I used to power the motor...Last edited by Zara; 01-27-2014, 05:29 AM.
Leave a comment:
-
Brazing...
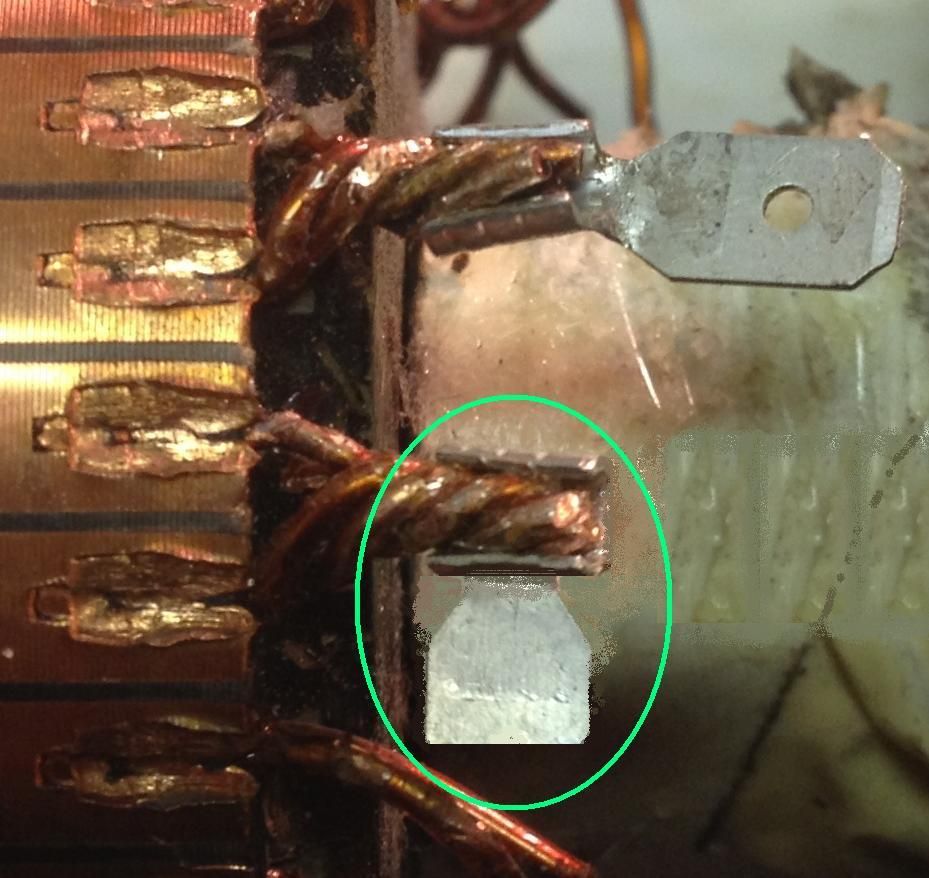
Originally posted by sampojo View PostI have been running a few tests on the best way to redo my commutators on my baldor and have decided upon using connectors. I plan on using a strip of bronze fully wrapping the wire and coming off at a right angle, but this retouched photo shows the idea.
I have kept the original wires clipped in one commutator and dremmeled them out in the other. I will put wires back into it and try to do a compression of the brushes to grip the wires on the comm segments.
I have looked into silver solder since Ufo has been clear about regular solder getting splattered and melted in asym motors. I am disappointed to report that what I have acquired so far seems to be susceptible to normal soldering temperatures, which means same problem as regular soldering. So much for that. But I have found my micro-torch can get brazing rod to melt. As you may see in the picture of the connector, being removed from the heat sink effect by being extended away from the commutators will allow the torch to weld the connectors with brazing material. I am planning on getting a slightly lower temperature range by alloying it with a touch of solder/silver solder too. I could crimp the connectors but my experience with crimping is dismal.
Since I see no heat damage possibility on brazing the connectors I believe I have found the solution with my commutators.
@Ufo, sound good to you? TIA
I have always ruled out any such welding or brazing directly on a commutator, as I felt it would destroy it.
@Ufo, would you agree here or am I wrong?
I plan on using a quadfilar of 30ga making it come in around a 21 ga resistance. I am planning on about 12-15 ft per coil pair, at around .6 ohm per coil.
@Ufo, I know you recommended 18ga at on point but I have always had heating problems. I haven't run the numbers but a .2 or .3 ohm coil is scaring me off.
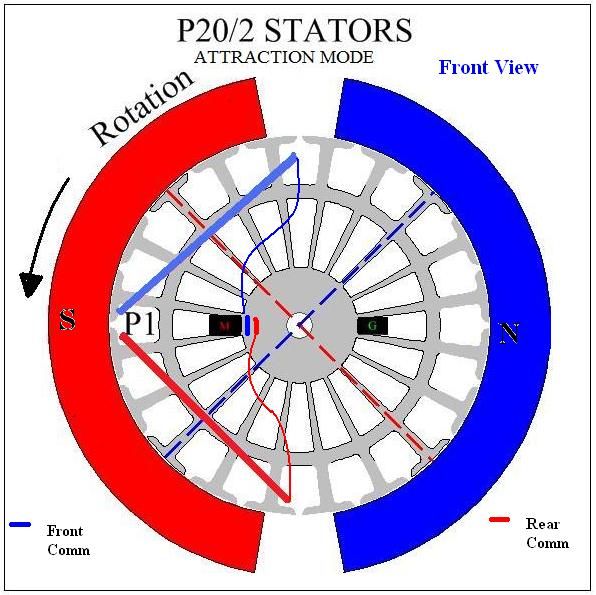
Now I have been reading and rereading the attraction repulsion design info and I am definitely going for attraction mode and I think you have stated that this diagram is correct.
When I get it running I will look for the best timing, as the Baldor design gives me a complete free hand here.
As I go forward with the commutators with a right angle connector the commutators will become either left or right-handed so to speak. I just feel a right angle connector is very important to saving room between the commutator and the rotor. One thing about asymmetric winding also is that the wire always comes off the coil several poles away from the comm segment it must attach to and comes in at a low angle onto the segment. That would be perfectly intercepted by a right angle connector. So I must now determine exactly and correctly whether a commutator will be left or right handed. My analysis of this diagram is telling me my commutator connections must use a left-handed rule with the thumb pointing along the shaft to the outside of the motor and the connectors would then point in the direction of the fingers.
UFO: Attraction mode diagram correct right?
I am wondering if the repulsion mode would use a right-handed comm. but my head is throbbing right now...
keep on keepin' on
PS: I think I might have gotten some regular solder mixed up with my silver solder. found the right stuff and it does NOT melt with a soldering iron. But I am thinking I like the brazing rod better...
Hello Sam,
I like the idea of the copper/brass connectors wrapping whole wire, and angled male connector for coils connection...and crimping it (Here, look at a professional electrical shop for big size crimps and wire strippers players, and not talking about the big ones for 6 and 4 gauge...those are too expensive)
About Brazing the wires coming out of comm is fine, however, when it comes to direct heat to copper element with a torch...you are risking to overheat the comm mica/bakelite beyond allowed temperatures and mainly doing it UNEVENLY...that creates fatigue unevenly spread around mica...toasting it...and what would happen is that after certain use it will start cracking and end up falling off the whole duck tail element...big loss...collapsing with brushes and possible wires too...
What I recommend if you have no other choice but to torch direct elements...then get a couple of rags swamped/dripping in cold water, and wrap it around the whole commutator tight, only exposing the area to be brazed...I do not know if you have experience brazing...but I will tell you a tip in case...You must first heat up element before touching it with brass rod...then get rod pressed slightly till you see it starts melting and spreading evenly into element area ONLY (I would try exactly at the gap where there is still copper from the wires...in the lower zone, trying to adjust the torch flame pattern to the finest and bluish you could)
I am an expert in the Automotive Body Work/Refinishing Industry my friend...I could weld from stainless steel, aluminum, alloys...to brass and even plumbing straight lead...
Make sure you choose the rods with the white powder (Flux Coated), the finest you could get...also make sure to run a wire brush right after each weld "touch", if you feel have to re do it...since flux leaves some carbon crystal residues that are not electrical conductive but insulation...
However, from what I get you have one motor ready for crimping only (not brazing direct on elements) since you have all wires sticking out...so it is just one motor right?
Related to Diagram, that is correctly set on attraction mode...and nope, feeding through right handed comm will not create repulsion mode, just will rotate opposite than arrow (CW) IF feeding same way as left side. Remember a "Full Repulsion Mode" (all coils -North and South- at repulsion) could only be achieved with four brush, four stator system...see Imperial for details
In Your Motor, what you could do is time brushes to fire using Stronger Repulse Mode than Attract Mode by getting South of P1 Bisector to fire at a closer angled than the one shown on Diagram related to South Stator Bisector....it will be great that you could run a test on this two modes of timing (As Diagram and like I described before)...while measuring the DC Amps in both modes...same exact voltage for both of course...
Regards
UfopoliticsLast edited by Ufopolitics; 01-27-2014, 03:46 AM.
Leave a comment:
-
Attraction mode Winding direction needs to be nailed down
I have been running a few tests on the best way to redo my commutators on my baldor and have decided upon using connectors. I plan on using a strip of bronze fully wrapping the wire and coming off at a right angle, but this retouched photo shows the idea.
I have kept the original wires clipped in one commutator and dremmeled them out in the other. I will put wires back into it and try to do a compression of the brushes to grip the wires on the comm segments.
I have looked into silver solder since Ufo has been clear about regular solder getting splattered and melted in asym motors. I am disappointed to report that what I have acquired so far seems to be susceptible to normal soldering temperatures, which means same problem as regular soldering. So much for that. But I have found my micro-torch can get brazing rod to melt. As you may see in the picture of the connector, being removed from the heat sink effect by being extended away from the commutators will allow the torch to weld the connectors with brazing material. I am planning on getting a slightly lower temperature range by alloying it with a touch of solder/silver solder too. I could crimp the connectors but my experience with crimping is dismal.
Since I see no heat damage possibility on brazing the connectors I believe I have found the solution with my commutators.
@Ufo, sound good to you? TIA
I have always ruled out any such welding or brazing directly on a commutator, as I felt it would destroy it.
@Ufo, would you agree here or am I wrong?
I plan on using a quadfilar of 30ga making it come in around a 21 ga resistance. I am planning on about 12-15 ft per coil pair, at around .6 ohm per coil.
@Ufo, I know you recommended 18ga at on point but I have always had heating problems. I haven't run the numbers but a .2 or .3 ohm coil is scaring me off.
Now I have been reading and rereading the attraction repulsion design info and I am definitely going for attraction mode and I think you have stated that this diagram is correct.
When I get it running I will look for the best timing, as the Baldor design gives me a complete free hand here.
As I go forward with the commutators with a right angle connector the commutators will become either left or right-handed so to speak. I just feel a right angle connector is very important to saving room between the commutator and the rotor. One thing about asymmetric winding also is that the wire always comes off the coil several poles away from the comm segment it must attach to and comes in at a low angle onto the segment. That would be perfectly intercepted by a right angle connector. So I must now determine exactly and correctly whether a commutator will be left or right handed. My analysis of this diagram is telling me my commutator connections must use a left-handed rule with the thumb pointing along the shaft to the outside of the motor and the connectors would then point in the direction of the fingers.
UFO: Attraction mode diagram correct right?
I am wondering if the repulsion mode would use a right-handed comm. but my head is throbbing right now...
keep on keepin' on
PS: I think I might have gotten some regular solder mixed up with my silver solder. found the right stuff and it does NOT melt with a soldering iron. But I am thinking I like the brazing rod better...Last edited by sampojo; 01-27-2014, 02:21 AM.
Leave a comment:
-
Originally posted by Ufopolitics View PostHey Machine,
Please post videos of that little build when done!
On the Dual Rotor Imperial, we do not need such sophisticated bridge design like I originally posted...
[IMG][/IMG]
After designing the Three Pole Dual...I realized just another set of laminates without the poles would do...in order to simplify design plus reduce co$t$.
[IMG][/IMG]
[IMG][/IMG]
This way much easier to cut on waterjet...we could use long fine bolts/nuts at common areas to Inner-Outer rotor to secure the whole assembly.
My 911 Electric Golf Car Design? 0-60 MPH in two hours?... ...Yeah, not seconds, until I install the Imperial Asymmetric...
It is based on a Club Car Aluminum Chassis...Fiberglass and Carbon Fiber Body...
Regards
Ufopolitics
You got a lot of cards up your sleeves! The golf karts are off the chain! We can drive those on the street in Japan. With signal lights, highs & low beams, horn and wipers...
Keep it Clean and Green
Midaz
Leave a comment:
-
Price of a new baldor full retail
Originally posted by Midaztouch View PostMachinealive
Here are my thoughts:
1.) It's a Prototype motor that takes about 34hours of touching to hand build it!
2.) It can run a 6kw generator @ 48v ~ 60v(up to wire gage) no problem
3.) EV applications; electric motorcycles, small ev cars, go karts...etc (perfect for 250cc class motorcycles = most sold and currently on the road world wide)
4.) It has the capability to run on 2 channels for ECO mode; charge back the battery pack and extend range\highway driving. (It looks like it's better than regenerative braking!) *WOW FACTOR*
5.) I've haven't found a motor in the same weight that comes close to the efficiency. From UFOs homemade torque test, this motor would be considered by National Electrical Manufacturers Association(NEMA) in the Super Premium Efficiency class(IE4) = $$$$$!
*NOTE* Hopefully we will have official lab test results soon.
6.) Asymmetric Imperial motors are super rare! Less than 10 handmade motors on the planet. Your motor is number two and it's been in all the YouTube test videos!
Conclusion: The bidding has started at $2000 for the #2 Asymmetric UFO Imperial prototype motor By: Machinealive......
*HINT* I feel as though a regular UFO motor should start @ $3600, if it was in production phase. If it's efficiency rating is in the IE4 class by NEMA from lab testing, It would be a lot more$$$$$
Here's a chance to buy a Cutting Edge Technology that you can't buy off of the shelf. Good luck with your bidding ladies and gentlemen
Keep it Clean and Green
Midaz
Leave a comment:
-
UFO
I just had my whole post typed and I got kicked.
Ufo, if you ever wanted to sell some of you carts let me know, or even consider selling copies of your molds, to body guys so they can sell to local golf courses, seems like a good idea.
Anyway, here was a little vid I made of my progress.
Induction motor progress - YouTube
So, UFO, we have to decide for sure on a plan, before I get a quote. take you're time, and think of everything. Will the magnets be heavier, or the coils, which do we spin, I am still envisioning the middle section to be easier to spin, I would like to see how brush plates fit, or did you guys get the tronics done for brushless? what if we glued magnets to outside of imperial housing(double up), then make outer rotor to fit. We could replace the mags with rare earth. Just saying, there's so many options.
We have a lump of marble to create something with. If any one else is going to want to get in on this, the most expensive part of waterjet is setup, they get cheaper as you buy more. Just a heads up.
later
machine
Leave a comment:
-
reversing input
hi sir,
namaste.
thanks for the immediate reply. will do it so sir. post the results by tomorrow evening.
once again thanks for the immediate response.
regards and namaste.
kumar
Leave a comment:
-
Originally posted by ajaya999 View PostOhhh. I just noticed I did the winding in just opposite.
UFO drawing says ccw on rhs and cw on lhs
I just did it in reverse - all 13 pairs...
wtd... shall i continue - again only to understand it doesn't work
perhaps the swelling in my fingers go eternal
Hey sir, wtd. continue or unwind and redo?
kumar
looking at his swollen fingers...
(kogs style imitator )
Kumar,
Just finish the two pairs left...then if you wanted rotation in specific original way as diagram...then reverse Input.
Regards
Ufopolitics
Leave a comment:
-
reverse winding
Ohhh. I just noticed I did the winding in just opposite.
UFO drawing says ccw on rhs and cw on lhs
I just did it in reverse - all 13 pairs...
wtd... shall i continue - again only to understand it doesn't work
perhaps the swelling in my fingers go eternal
Hey sir, wtd. continue or unwind and redo?
kumar
looking at his swollen fingers...
(kogs style imitator )
Leave a comment:
-
Originally posted by machinealive View PostNice UFO
My 8 year old son asked if you have any monster trucks, .
Are you still manufacturing or selling any of those. Nova Scotia has an over abundance of golf courses. I could probably wheel and deal, maybe one to each course as a " clubhouse car" . Were you selling lots or just custom jobs for people.
Machine
Tell your son...I only have made and installed an asymmetric motor on my Four year old Grandaughter's Barbie Pink Corvette...so, she wonders why she can so easily kick As* of all other kids big Monster Trucks, Escalades and Jeeps...leaving them in the middle of the road needing a jump start...
I have only built the 911 per custom order...and only made three...including this one that is seating in my garage.
[IMG][/IMG]
The first one was the Red one on right...classic headlamps and bigger whale tail.
Regards
Ufopolitics
Leave a comment:
-
Nice UFO
My 8 year old son asked if you have any monster trucks, .
Are you still manufacturing or selling any of those. Nova Scotia has an over abundance of golf courses. I could probably wheel and deal, maybe one to each course as a " clubhouse car" . Were you selling lots or just custom jobs for people.
Machine
Leave a comment:
-
Thanks...
Originally posted by erfinder View PostWOoooooow. That thing is too cool, is it yours? When are you going to install your motor in it?
Regards
You have a great Thread open there as well, very interesting, and very nice machines and effects.
I congratulate you for opening it and exposing your findings in the open...I will stop by in time, when I feel I could contribute to be of some useful help.
I built this small Body a few years ago...and I have made the Molds, actually this is like the third I have built...no big mass production..
[IMG][/IMG]
[IMG][/IMG]
Prior I have built an exotic real car from scratch...mid engine, very slant nose...455 Engine Block...very fast...I also want to make it electric.
Unfortunately GE is the one who makes the motor for this model and it is not convertible to asymmetric because of too narrow poles that would only take the single heavy gauge wire...so, adapting it requires pretty expensive adapting machine work to its trans-axle.
Regards
Ufopolitics
Leave a comment:
Leave a comment: