Announcement

Collapse
No announcement yet.

My Asymmetric Electrodynamic Machines

Collapse
X
 
  • Filter
  • Time
  • Show
Clear All
new posts

  • Kogs update

    G'day UFO and Team
    Just to let you know where I am at
    I am sorry I have not been active here for some time now
    I still have to buy a battery and some more Super Caps to finish Nessie and I have run out of money, work has been scarce around here so until I get some work I have to stop working on my projects here

    Also Jill and I have decided to sell our house and buy or build a smaller one so we need to do some tidying up around the house especially my workshop

    Before I joined this list here I started building an 18' wooden boat I have named her Reelaxation and as she has been sitting unfinished in her shed for over 2 years now I need to get her finished and out of the way it will take me about 3 months I have all the materials to finish her

    I really am sorry I am not able to finish Nessie But it will happen

    Its good to see new ones showing interest and some coming back to continue their building I am still following and will be back as soon ASAP

    Corn boy it sounds like a nice property your Daughter bought I would love to live in Queesland But I am sure we will finish up in Tasmania

    Kindest Regards to everyone

    Kogs busier than ever

    Comment


    • Welcome Hunting Ross

      Originally posted by HuntingRoss View Post
      So. General question.

      Turning the armatures back to back necessitates doing the same to the casings as the magnets are towards the bottom of the casing.

      This puts the ends of the magnets in opposition approximately 10mm apart which is the distance between the laminations of one armature to the other.

      In a perfect world the north and south magnets in the rotated casing would want to be removed and rotated to attract their twins in the other casing but they are securely bonded.

      I anticipate this isn’t ideal...but my question is this –

      Does it sound like a fundamental problem to the operation of the motor or is it “just not ideal” ?

      Thoughts welcome

      mark
      Hello and Welcome Mark!

      Sorry about delay in getting back, I have been awfully busy lately...now back on your build...

      I do not clearly understand what you are trying to do when you say "turning armatures back to back"...as well as "doing same to casings "...

      If you meant to joint two casings and take magnets off and re set them properly...I do NOT recommend to do that in your first build, keep it simple, just cut off a ring of one of casings enough to allow the brushes plus caps to meet your second commutator...and just use ONE SET of Stators as they come in one casing.

      It will help if you could add some Graphics, Sketches or pictures of your build.

      Thanks and welcome again.


      Ufopolitics
      Principles for the Development of a Complete Mind: Study the science of art. Study the art of science. Develop your senses- especially learn how to see. Realize that everything connects to everything else.― Leonardo da Vinci

      Comment


      • Am still around...

        Hello to All,

        I just wanted to come by and say...am still here...

        I received my UFO Kit...plus I have also the rotor kit...so I have my hands full...(I wanna do one rotor with Groups while another with Pairs..."ALL NORTH"...they need some work before any winding could be done.

        But, but...that is not the main reason I have been busy...I have a surprise coming very soon...I find it fascinating...and I love it...and so I believe you also will...

        Kind regards to all.

        @ my Australian Guys...(Cornboy and Kogs)...I see you are having fun swapping Real State there!...

        Is Ok, I know you will be back whenever you are ready to go...

        Wish You the very best of luck!


        Ufopolitics
        Principles for the Development of a Complete Mind: Study the science of art. Study the art of science. Develop your senses- especially learn how to see. Realize that everything connects to everything else.― Leonardo da Vinci

        Comment


        • Hey UFO, wondered where you have been, when you take absence it's normally to introduce something new, will be here looking in, can't wait!.

          Where I will be moving to, is wild pristine country, and will take a while to settle in, and I will be back.

          It's hectic moving after 16 yrs, as you well know, when you moved your shop.

          Kogs, Tassie, BRRRRRRRR!!!!!!!

          All the very best, Cornboy.

          Comment


          • Still here can't wait

            Hello to All,
            Been real busy with two jobs. But still reading these posts to try and keep up to date.

            Will be building a earthbag shop that will be totally or part underground because the seasons have become so extreme here in S. Carolina. The extreme conditions prevents me from working in my shop. Building one at relative's home first.

            Still working as time allows on different aspects of the modified Ufo motor.

            Can't wait to see what news you have Ufopolitics!!

            Would be nice to see Australia, we have missionary friends there.

            Best to All,
            wantomake

            Comment


            • Originally posted by Ufopolitics View Post
              Hello to All,

              I just wanted to come by and say...am still here...

              I received my UFO Kit...plus I have also the rotor kit...so I have my hands full...(I wanna do one rotor with Groups while another with Pairs..."ALL NORTH"...they need some work before any winding could be done.

              But, but...that is not the main reason I have been busy...I have a surprise coming very soon...I find it fascinating...and I love it...and so I believe you also will...

              Kind regards to all.

              @ my Australian Guys...(Cornboy and Kogs)...I see you are having fun swapping Real State there!...

              Is Ok, I know you will be back whenever you are ready to go...

              Wish You the very best of luck!


              Ufopolitics
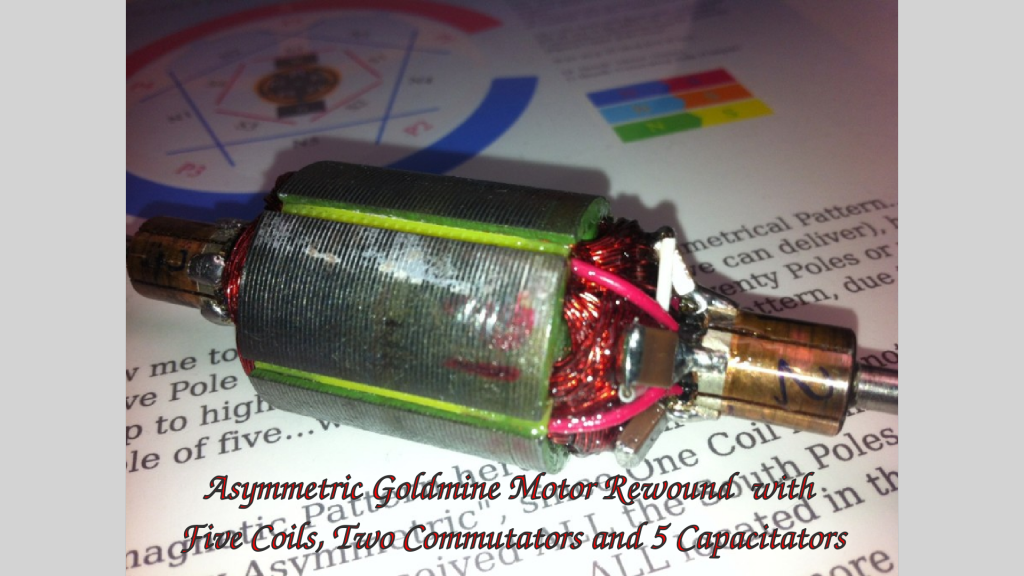
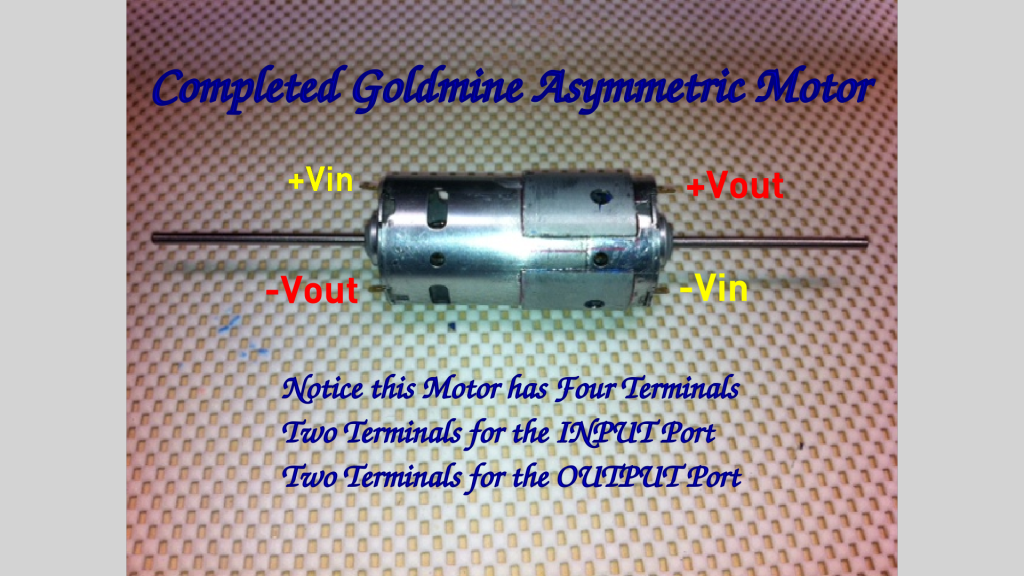
              Hello Dear Friend UFO, nice to hear from you. I also await for the mystery news. Right now I am preparing Part1 of the Asymmetric Dual Pentagon Motor which will cover Build and Theory of Asymmetric Motors, together with small pre-exiting Videos of this Motor. I thought as I was waiting for the various bits and pieces like POWER SUPPLY, lets get part 1 out the way.
              The part 2 will mainly cover data analysis.
              After this goldmine motor, I will join you with the Imperial UFO kit Wound or built as ALL NORTH TYPE. (That kit when I look at in the box, is quietly whispering, "When will I take off to the new horizons?..."
              The Part1 Video of Goldmine Motor will be available for the preview soon. All the Best Luck.


              @ Cornboy and Kogs, wish you guys first best success in your projects of the physical world (real estates). I know you guys will jump back to UFO-R&D right back when the time is right. Best Luck.


              Here are just at random, Four Frames from the part1 of the video being prepared:


              1.


              2.


              3.


              4.


              Wish everyone all the best.


              Warmest regards

              lightworker

              Comment


              • End to End motor casing

                Originally posted by Ufopolitics View Post
                I do not clearly understand what you are trying to do when you say "turning armatures back to back"...as well as "doing same to casings "...

                If you meant to joint two casings and take magnets off and re set them properly...I do NOT recommend to do that in your first build, keep it simple, just cut off a ring of one of casings enough to allow the brushes plus caps to meet your second commutator...and just use ONE SET of Stators as they come in one casing.

                It will help if you could add some Graphics, Sketches or pictures of your build.

                Thanks and welcome again.


                Ufopolitics
                Hi UFO. Apologies if I am using the incorrect terminology. You're correct in what you describe. I am joining two casings bottom to bottom as this seems simpler to me as a novice compared to trying to release the commutator from the donor motor and correctly aligning it on the re-build motor. Alas, despite this there is insufficient room on the back end shaft.

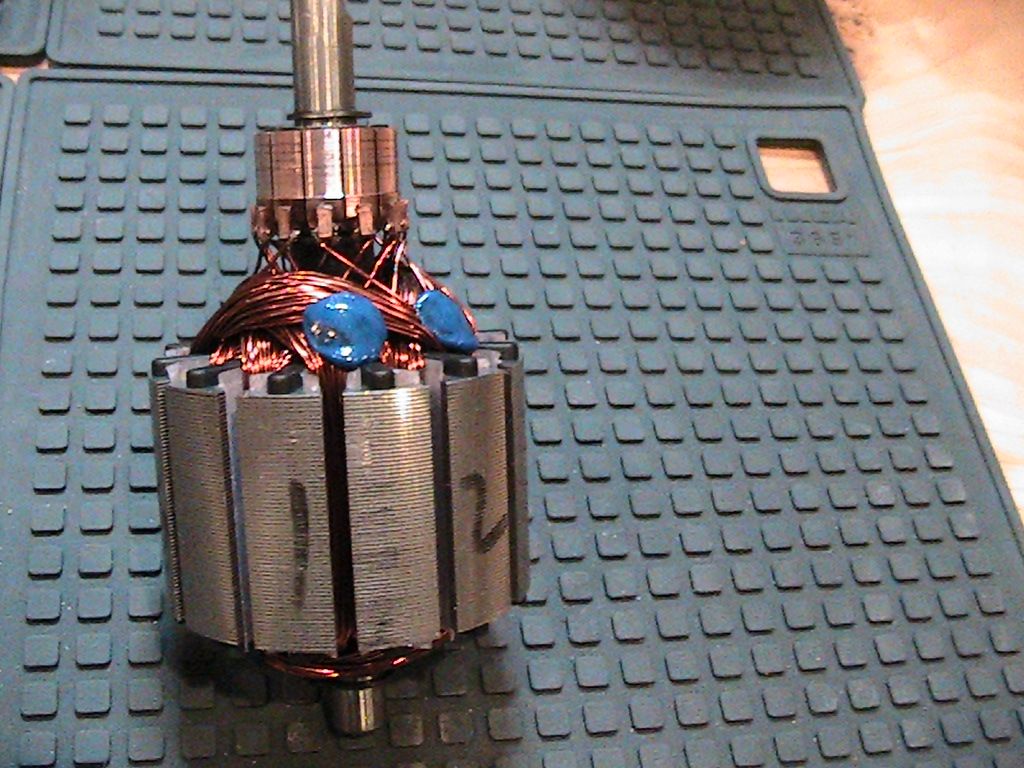
                Here's a few photos to try and describe a little better -

                [IMG][/IMG]

                If the stator magnet in view is the north magnet then the top edge is north and the bottom edge is south. When the two casings are turned to join, the two north magnets are facing south to south. I checked the field (?) with a magnet lowered down the axis and there is an amount of disruption at the adjacent edges but it is minimal and not much more than the field variation across the face of the curved magnet nearing the centre. So I'm going t bash on with this method.

                [IMG][/IMG]

                You can see in this photo the rear shaft is too small to fit a commutator. The blue dots appear to be a hot melt glue to stabilise the windings (?) they seem to serve no other purpose. The poles are already numbered.

                Thanks. mark.
                Last edited by HuntingRoss; 10-08-2014, 06:22 PM.

                Comment


                • Mark
                  Good to see you moving forward. Those blue dots as you call them are actually weights to fine tune the final balance of the rotor. You notice that they are only in one area and not smeared all over the coils as one would do to hold wires.
                  Dana
                  "Today's scientist have substituted mathematics for experiments and they wander off through equation after equation and eventually build a structure which has no relation to reality."
                  Nikola Tesla

                  Comment


                  • Mark
                    Are you planning to use just the one rotor or put two together as one. If you are just going to use the single rotor then you may have enough shaft length, it will take calculation to know. Then you will cut one case short enough and weld the two together. It usually is close to one and one half the the length of the standard motor. By moving the commutator and laminates to a more central position on the shaft and adding the second commutator, you would have it.
                    If you do not have enough shaft length, a new shaft is in order and then assemble as above. This would require only one set of magnets and one set of laminates. If you however want to use both laminates sets, you will need a longer shaft and all the magnets from both cases. Typically we use only one set of laminates, one set of magnets, one whole case and one part of the other case.

                    I am not sure if I have helped or confused you, ether way, keep asking questions. Have you built the small RS motor or the Goldmine motor as above? Look closely at the small size of the case on the right side. See how much of the second case was used.

                    Dana
                    "Today's scientist have substituted mathematics for experiments and they wander off through equation after equation and eventually build a structure which has no relation to reality."
                    Nikola Tesla

                    Comment


                    • Hi Dana. Thank you for taking the time. This is a lot clearer for me now.

                      This motor is rated at 2500rpm, so I hadn't even considered balancing would be an issue for such a small motor. It is 66mm diameter across the laminates. Add that to the fine tolerances of rotor and stator and I appreciate the engineering in these units. I think to replicate this tolerance without some engineering equipment would be more luck than judgement for me.

                      Originally posted by prochiro View Post
                      Are you planning to use just the one rotor or put two together as one.
                      I'm putting the two rotors together. The reason I'm going that way is my concern to recreate the tolerances as described above but mostly I had no confidence in separating the elements from the shaft without irreparable damage. Based on your rule of thumb '1.5 times the length' there definately wasn't enough length on the single shaft.

                      My experience of cutting cylinders (drainage/plumbing pipes) is the difficulty of making the cut perpendicular to the axis...and they're easy to cut compared to 2mm steel. I'm hoping that the route I've gone is simpler for a beginner although perhaps not ideal.

                      Have you built the small RS motor or the Goldmine motor as above? Look closely at the small size of the case on the right side.
                      I thought about trying out on one of the smaller units but small fiddly motors for my stubby builders hands struck me as a bad idea. I chose this motor for being reasonably cheap and reasonably large to literally 'get to grips with'

                      One pertinent question as I push on...how does one ensure stripping down a motor without trashing everything as you try to pull it apart. Can you use heat to break the adhesive bonds to the shaft ?

                      I have searched for motor component suppliers but no one seems to sell a kit of parts for easy mounting on to a new shaft.

                      Best regards. mark

                      Comment


                      • 3 pole or 12 pole

                        OK. I'm heading WAY out of any comfort zone, so I run the risk of annoying some experienced builders.

                        My motor is 12 pole which I was going to wind all north 3 coils per group. I have no idea if it will work but it sounds like a simple build...BUT...the 3 pole build - http://www.energeticforum.com/201571-post96.html - sounds even simpler (I like the sound of that for my first experiment)

                        So if I wind that model, I presume I grab 4 poles per coil and rotate the brushes 90 degrees...job done ?

                        Or does it manifest itself as this - http://www.energeticforum.com/201972-post301.html - which I confess is confusing me a little. I understand the description to be in my words -

                        Dark blue is tied off on the top comm, grabs 4 poles and ties off on the bottom comm (ie "all blue colours are isolated north poles") then same for light blue and the green.

                        Or (as they are pairs) does it mean the dark blue is tied to the top comm grabs 4 poles then crosses over to the red and grabs 4 poles then ties off on the bottom comm.

                        If it is the 3 pole model, I would tie 4 comm elements together and be in business...simple.

                        Or...did I make no sense ?

                        thanks. mark

                        Comment


                        • Goldmine Motor

                          OK. I'm heading WAY out of any comfort zone, so I run the risk of annoying some experienced builders.
                          Mark

                          The radio Shack motor is small for a first motor but the Goldmine motor is not. There are many issues that one must learn to overcome when building your first motor. I have not noted that anyone has built there first motor and was happy with it. The Goldmine is much larger and as a five pole, has all the information available here to get it done. As I said, your first wind has a rough learning curve but when you add in a double rotor, MAY THE GODS HELP YOU.

                          As you may have seen on UFO's site, I have built a 4 rotor length Goldmine but could not have done it without first building many singles and doubles. Please consider your first to be the Goldmine as others who have tried there own motors first have not only taken severe time and help for each step from many of us, and have failed in the attempt.

                          Dana
                          "Today's scientist have substituted mathematics for experiments and they wander off through equation after equation and eventually build a structure which has no relation to reality."
                          Nikola Tesla

                          Comment


                          • Both UFO Kits from Imperial arrived!

                            Ufopolitics,

                            Great to hear from you!

                            Both UFO Kits from Imperial arrived!
                            https://imageshack.com/i/id4wSDKpj


                            They could use some help in the packaging department.

                            Parts just thrown in one of the boxes with little packaging.

                            Lots of scuff marks/cosmetic damage.

                            One of the armatures has a little damage.

                            UFO, will this cause a problem with what we are getting ready to do?
                            https://imageshack.com/i/f0ogdZYcj


                            Looking forward to the surprise as well as new winding instructions!

                            Thanks for all you do,

                            IndianaBoys

                            Originally posted by Ufopolitics View Post
                            Hello to All,

                            I just wanted to come by and say...am still here...

                            I received my UFO Kit...plus I have also the rotor kit...so I have my hands full...(I wanna do one rotor with Groups while another with Pairs..."ALL NORTH"...they need some work before any winding could be done.

                            But, but...that is not the main reason I have been busy...I have a surprise coming very soon...I find it fascinating...and I love it...and so I believe you also will...

                            Kind regards to all.

                            @ my Australian Guys...(Cornboy and Kogs)...I see you are having fun swapping Real State there!...

                            Is Ok, I know you will be back whenever you are ready to go...

                            Wish You the very best of luck!


                            Ufopolitics

                            Comment


                            • IndianaBoys

                              Hello, from your neighbor, MichiganBoy. That rotor should be OK once it is cleaned up and re-coated. I thought that we were past the bad shipping from Imperial. Maybe we are getting there seconds. All is well that ends well. I am still waiting for my orders but now even when they come, will have to wait eight week to wind the new rotors. I was crossing a bridge Thursday morning with a wood trailer and it slipped off the side of the bridge with the two left wheels. Got some help with pulling it back on but while doing that, the trailer wheel hit a rock and turned 90 degrees, pushing me into a large rock and breaking my left hand and thumb. Cant wind coils that way as well as do buttons on my shirt. But as I said earlier, all is well that ends well. We will all get there in our time. Good luck with your winding and have fun.
                              Dana
                              "Today's scientist have substituted mathematics for experiments and they wander off through equation after equation and eventually build a structure which has no relation to reality."
                              Nikola Tesla

                              Comment


                              • Similar to a Torque Master Motor...

                                Originally posted by HuntingRoss View Post
                                Hi UFO. Apologies if I am using the incorrect terminology. You're correct in what you describe. I am joining two casings bottom to bottom as this seems simpler to me as a novice compared to trying to release the commutator from the donor motor and correctly aligning it on the re-build motor. Alas, despite this there is insufficient room on the back end shaft.

                                Here's a few photos to try and describe a little better -


                                If the stator magnet in view is the north magnet then the top edge is north and the bottom edge is south. When the two casings are turned to join, the two north magnets are facing south to south. I checked the field (?) with a magnet lowered down the axis and there is an amount of disruption at the adjacent edges but it is minimal and not much more than the field variation across the face of the curved magnet nearing the centre. So I'm going t bash on with this method.


                                You can see in this photo the rear shaft is too small to fit a commutator. The blue dots appear to be a hot melt glue to stabilise the windings (?) they seem to serve no other purpose. The poles are already numbered.

                                Thanks. mark.
                                Hello HuntingRoss,


                                Ok, first, that Motor looks a lot like a Torque Master made in China that is used as Starter Motor for R/C Gas Helicopters. I have bought so many of this Motors...till I found out they make another more "Elongated" version which does not require to cut one casing ring to be added/welded to main casing...so, if you could, try searching for another "model" within same brand that would offer such attributes...it will save you a great deal of work and time.

                                [IMG][/IMG]

                                On a second part...if it is your first Asymmetric Build, and you do not have any experience in transforming motors before...meaning cutting and welding cases, and getting pretty good shaft/bearings alignments...then I recommend to go for the easier way, meaning, just one set of stators magnets...and just one rotor.

                                Now related to the type of winding of a 12 pole...it gives you many alternatives, like you just posted above...so I will give you the different results.

                                1- Three Pole, single wind, by grabbing 4 poles (12/3=4) and wrapping three single, independent coils. This is the simplest winding, however, since you have 12 commutator elements...then you would have to "bridge" also 4 elements together, which would expand too much the firing time per coil, this fact would increase the torque and speed of this motor...BUT also would increase the Amp Draw to max, so it is recommended to use finer wire gauge and much more turns in order to raise resistance, then lowering the amps draw.

                                2- The Star of David you have referenced before is just a Three Pole type, except that those three single coils are expanded now to both 180º of the rotor, so now it would be 3 North and Three South Coils, naming it correctly it would be a Three Pairs or P3.

                                3- The P12 Alternative, is a more complex design, however you will obtain much better results in performance all over, like higher speed, higher torque, and more output, but, still it is a North South older design, this will bring quite big arcing at commutators when higher power is applied...I made a diagram, where brushes do not need to be turned 90º shown below:

                                [IMG][/IMG]

                                4-All North Groups...Now, if you wanna go for "the Gold"...since you have started on this Thread at this stage...then do this type:

                                [IMG][/IMG]

                                I have just made this Diagram, since I realized I never did it when we started making conversions to All North Windings...it is easy, although it may look complicated...

                                You start by G1 (True Blue) and start turning first Coil 1 (1), then (2), then (3), all turned same direction, in series and at the final one (3) you attach it to the matching lower commutator element.

                                Then wind G2 (Light Blue), Coil (1), (2) then (3)...and so on till you reach G12 (Purple) which would be your final Group that would close sequence.

                                I did it also in order that brushes do NOT need to be rotated.

                                When pressing commutators in shaft, make sure comm elements line up as shown on Diagram related to poles.

                                Now, if you like to compare types, you could do also number 3 or any of the above (1,2) then run tests on all of them supplying same source of power...

                                Hope this helped you to make a decision where to go.


                                Regards


                                Ufopolitics
                                Principles for the Development of a Complete Mind: Study the science of art. Study the art of science. Develop your senses- especially learn how to see. Realize that everything connects to everything else.― Leonardo da Vinci

                                Comment

                                Working...
                                X