Announcement

Collapse
No announcement yet.

My Asymmetric Electrodynamic Machines

Collapse
X
 
  • Filter
  • Time
  • Show
Clear All
new posts

  • Thanks UFO.

    One way or another I will CAD this tomorrow to demonstrate what I'm saying.

    There is one thing I should seek absolute clarity on...and this could be the difference between what you're saying and what I'm understanding and this would remove all the frustration.

    When we say 'connecting' or 'start firing' we mean the comm is just entering the brush...

    When we say 'disconnecting' or 'cease firing' we mean the comm has fully left the brush...

    Also, the only thing that is not completely accurate on my CAD schematic is the brush is not drawn at 30º which I will correct when I post my next image...it fully covers the face of the comm segment which is important for visualising the sweep angle of the comm across the brush from connection to disconnection...if I'm understanding those terms correctly.

    And UFO, I mean no disrespect when I refer to 'Theory'...it's what you give to someone to put into practice. My point which I hope to clear up when I post my schematic is the theory doesn't work in practice for the 4 pole pairs on a 12 pole rotor.

    Happy Hunting

    mark

    Comment


    • Originally posted by HuntingRoss View Post
      Thanks UFO.
      My pleasure Mark...

      Like I wrote before, I am also doing this (while leaving everything else in "stand by") in order to clear this whole scenario that dates back quite some time by now...

      One way or another I will CAD this tomorrow to demonstrate what I'm saying.
      I already did Mark...

      There is one thing I should seek absolute clarity on...and this could be the difference between what you're saying and what I'm understanding and this would remove all the frustration.
      Right, agree 100% with you.

      When we say 'connecting' or 'start firing' we mean the comm is just entering the brush...
      That's right, P1 is "just" starting to touch commutator plate that corresponds to that circuit...take a look at CAD below:

      [IMG][/IMG]

      Yes, I drew each commutator element, by 30º apart.

      Now, First note the Brush is off related to Stators Bisector line by 11.5º moved according to rotation...yes, and if you could also move (BY COUNTER-ROTATE) about 4.0º both of your commutators related to Pole Center alignment would be even better.

      Now one thing that we both must realize is the total degree of angle play you have here to time correctly...and that is around 30º.

      Because between each Pair Bisector we have 120º (60º+60º) plus we have from Rotor pole to pole separation of 30º= 120º+30º=150º-180º=30º

      And 30º is EXACTLY your critical limits (5º at start and 20-25º at disconnect)

      When we say 'disconnecting' or 'cease firing' we mean the comm has fully left the brush...
      Yes, correct...commutator plate is NO LONGER contacting brush...is OFF, Circuit Dead.

      Here is the CAD result:

      [IMG][/IMG]

      Like I wrote before...you have a very narrow angle within LIMITS to do your adjustments here.

      However, there are many easy solutions to fix this problem, and I will show at the end of post...

      Also, the only thing that is not completely accurate on my CAD schematic is the brush is not drawn at 30º which I will correct when I post my next image...it fully covers the face of the comm segment which is important for visualising the sweep angle of the comm across the brush from connection to disconnection...if I'm understanding those terms correctly.
      Mark, the MAIN part I would like you to understand basically out of ALL this, is that by no means, once you visualize your CAD, and Rotate its Rotor objects together...you must never allow that P2 Coils 2 passes the South Bisector while is still ON!!

      And I mean You rather reduce to even One (1º) Degree at Repulse Interaction (at North Stator), rather than allowing this counter rotation to occur at South Stator in the all North Machines config.

      Even those CAD alignments I have posted above...even being "in compliance" I do NOT like them.

      P2 is turning off too close to South Stator

      And the Magnetic Influence from whole P2 coil 2, still will be opposing to rotation at those close limits.

      Therefore what I highly recommend Mark, is to take a good look at this previous post I did four pages back...OVERLAPPING ALL NORTH PAIRS

      You could also do that since you are building all north here...by overlapping your coils in the Pair, even by one pole, you would be reducing your Bisector to Bisector Angle by 30º+...


      I will make a CAD showing the difference.


      Regards


      Ufopolitics
      Last edited by Ufopolitics; 04-13-2015, 05:27 PM.
      Principles for the Development of a Complete Mind: Study the science of art. Study the art of science. Develop your senses- especially learn how to see. Realize that everything connects to everything else.― Leonardo da Vinci

      Comment


      • Overlapped All North 12 Pairs

        Originally posted by HuntingRoss View Post
        Thanks UFO.


        Happy Hunting

        mark


        Ok Mark, the Overlapped Coils in each Pair 'series'.


        Four Poles:

        [IMG][/IMG]


        Five Poles:

        [IMG][/IMG]


        Note that it reduced the interacting angle from bisector to bisector from 150 to 120 degrees.

        However, notice in order to keep about same angles, when winding five poles you do need to overlap grabbing two poles from first coil, instead of just one in four poles coils.


        IMPORTANT: I forgot to set the Brush at 11 degrees for this two IMGS, so, consider that, or rolling one element back for comm element connection, which ever is easier.


        Nice hunting!


        Ufopolitics
        Last edited by Ufopolitics; 04-13-2015, 06:43 PM.
        Principles for the Development of a Complete Mind: Study the science of art. Study the art of science. Develop your senses- especially learn how to see. Realize that everything connects to everything else.― Leonardo da Vinci

        Comment


        • Once again UFO. Huge appreciation for the effort involved in creating all these schematics. And it wasn't my intention that you should put everything on hold to resolve this, which makes me think I shouldn't have been building the fish a new home today.

          It also will make my schematic which is almost completed look like I have not taken cognisance of your comments.

          I have done a lapping pairs motor already but I'm still to write it up, and I think it resolves the issue that I will highlight in my schematic in the next hour or so, because it brings the Coil 2 bisector back by 30º which is a huge benefit.

          Stay tuned

          Still Hunting

          mark

          Comment


          • Originally posted by HuntingRoss View Post
            Once again UFO. Huge appreciation for the effort involved in creating all these schematics. And it wasn't my intention that you should put everything on hold to resolve this, which makes me think I shouldn't have been building the fish a new home today.

            It also will make my schematic which is almost completed look like I have not taken cognisance of your comments.

            I have done a lapping pairs motor already but I'm still to write it up, and I think it resolves the issue that I will highlight in my schematic in the next hour or so, because it brings the Coil 2 bisector back by 30º which is a huge benefit.

            Stay tuned

            Still Hunting

            mark

            Mark,

            I just need you to keep in mind what I am quoting below from my previous post:

            Mark, the MAIN part I would like you to understand basically out of ALL this, is that by no means, once you visualize your CAD, and Rotate its Rotor objects together...you must never allow that P2 Coils 2 passes the South Bisector while is still ON.

            And I mean You rather reduce to even One (1º) Degree at Repulse Interaction (at North Stator), rather than allowing this counter rotation to occur at South Stator in the all North Machines config.

            Even those CAD alignments I have posted above...even being "in compliance" I do NOT like them.

            P2 is turning off too close to South Stator


            And the Magnetic Influence from whole P2 coil 2, still will be opposing to rotation at those close limits under high speed rotation (Magnetic "Inertia").
            Any build that you make not complying with this main aspects above, honestly is a waste of time friend.


            They will render same results as you had before.


            Regards


            Ufopolitics
            Principles for the Development of a Complete Mind: Study the science of art. Study the art of science. Develop your senses- especially learn how to see. Realize that everything connects to everything else.― Leonardo da Vinci

            Comment


            • Originally posted by Ufopolitics View Post
              Mark,

              I just need you to keep in mind what I am quoting below from my previous post:

              Mark, the MAIN part I would like you to understand basically out of ALL this, is that by no means, once you visualize your CAD, and Rotate its Rotor objects together...you must never allow that P2 Coils 2 passes the South Bisector while is still ON.

              And I mean You rather reduce to even One (1º) Degree at Repulse Interaction (at North Stator), rather than allowing this counter rotation to occur at South Stator in the all North Machines config.

              Even those CAD alignments I have posted above...even being "in compliance" I do NOT like them.

              P2 is turning off too close to South Stator

              And the Magnetic Influence from whole P2 coil 2, still will be opposing to rotation at those close limits under high speed rotation (Magnetic "Inertia").
              Any build that you make not complying with this main aspects above, honestly is a waste of time friend.


              They will render same results as you had before.


              Regards


              Ufopolitics
              Understood UFO.

              As promised. The graphical representation of what I have been saying with regard to the 12 pole rotor in a 4 pole pairs configuration.

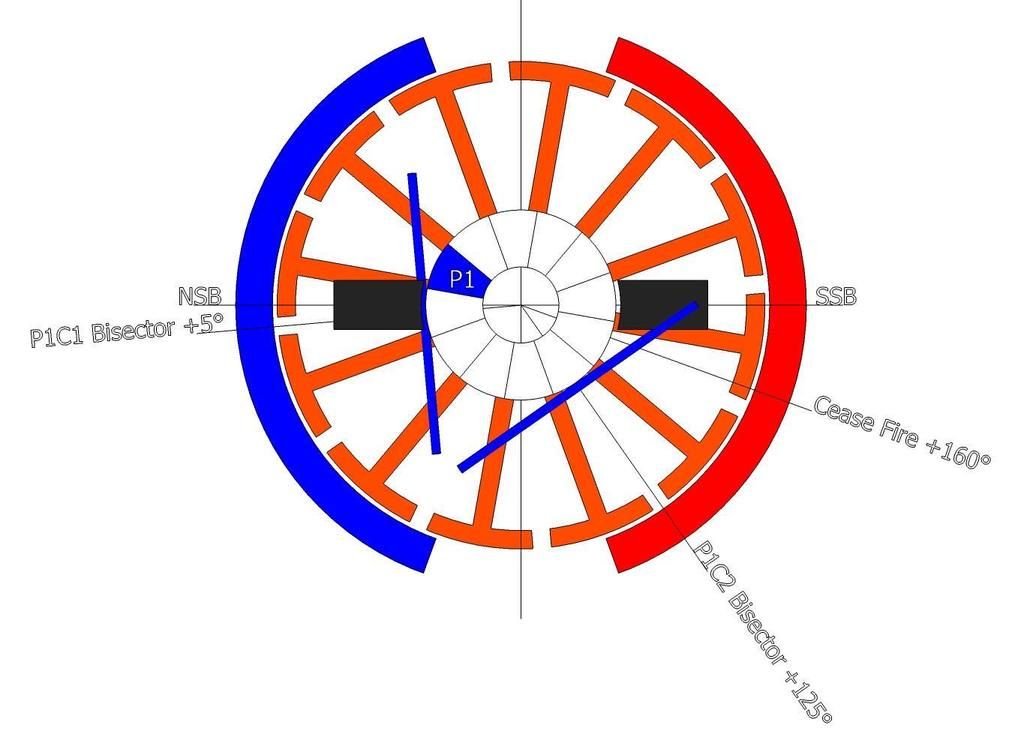
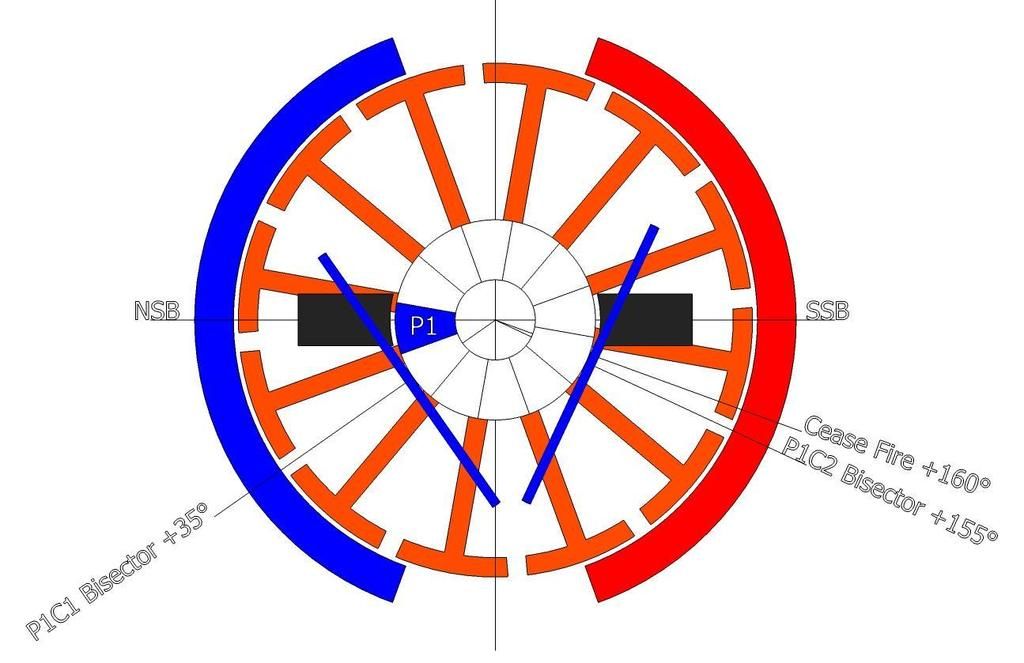
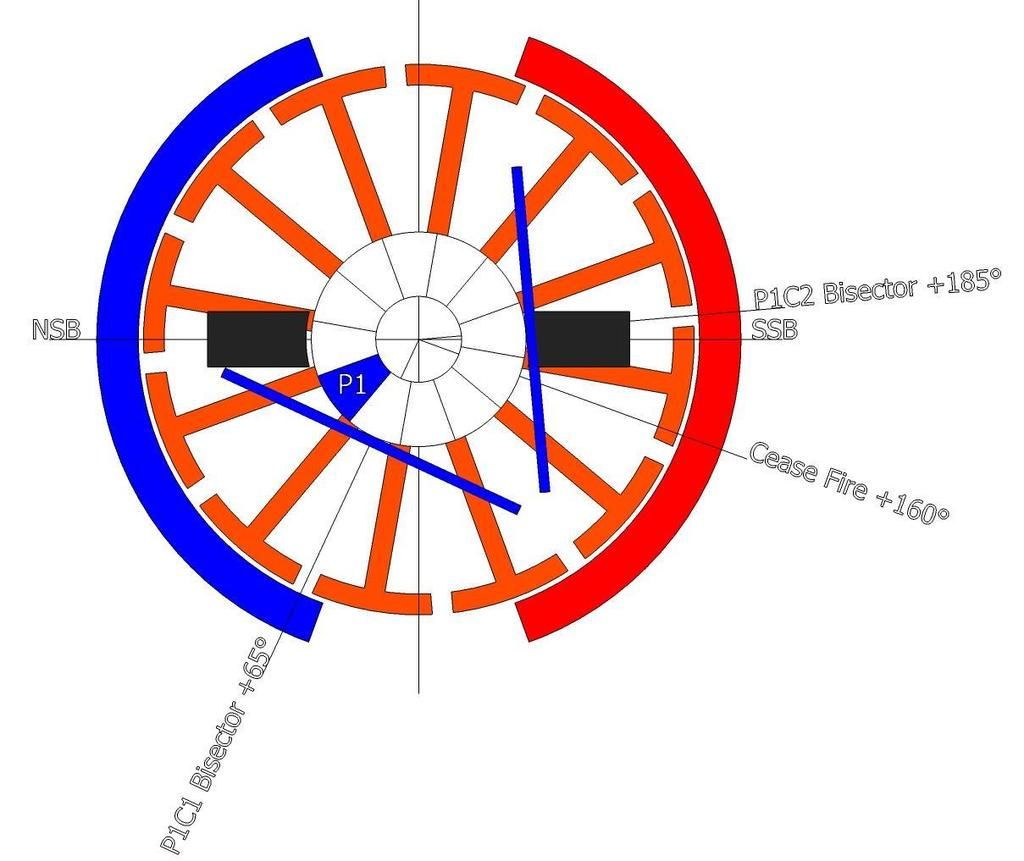
              There are three images in this sequence showing the 'sweep' of P1 comm across the brush. The point I'm laboring is the leading edge of P1 energising the coils and the trailing edge of P1 before it disconnects from the brush.

              The model is bashed up in Sketchup which I already have on this computer and is an accurate scale model of the OEM.

              Key points -
              The OEM setting for the brush is retained.
              NSB = North Stator Bisector.
              SSB = South Stator Bisector.
              Angles quoted are all past the NSB.
              The centre of the comm is centre of the slot.
              The brush is 30º wide and matches the comm.

              Image 1 shows the leading edge of P1 comm 5º on the brush. The trailing edge of P1 has still to sweep 30º to be in the same position. The coils are energised.

              [IMG][/IMG]

              Image 2 shows P1 comm advanced by 30º. The leading edge of P1 is 5º past the brush. The trailing edge of P1 has 25º to sweep before leaving the brush. The coils are still energised.

              [IMG][/IMG]

              Image 3 shows P1 comm advanced by 30º. The trailing edge of P1 comm left the brush 5º ago. The coils are now disconnected.

              [IMG][/IMG]

              So with P1 sweeping 60º the P1C2 bisector is at +185º past the NSB and the trailing edge disconnected 5º earlier. Giving P1 comm a total energised sweep angle of 55º.

              Hopefully this clarifies what I've been saying...Hopefully highlights some flaw in my understanding...But I have to say I have studied this and studied this and I can not see an error. As long as P1 is on the brush the coils are live.

              Happy Hunting

              mark
              Last edited by HuntingRoss; 04-13-2015, 09:22 PM. Reason: dang images didn't load

              Comment


              • Consistency

                Originally posted by HuntingRoss View Post
                Understood UFO.

                As promised. The graphical representation of what I have been saying with regard to the 12 pole rotor in a 4 pole pairs configuration.

                There are three images in this sequence showing the 'sweep' of P1 comm across the brush. The point I'm laboring is the leading edge of P1 energising the coils and the trailing edge of P1 before it disconnects from the brush.

                The model is bashed up in Sketchup which I already have on this computer and is an accurate scale model of the OEM.

                Key points -
                The OEM setting for the brush is retained.
                NSB = North Stator Bisector.
                SSB = South Stator Bisector.
                Angles quoted are all past the NSB.
                The centre of the comm is centre of the slot.
                The brush is 30º wide and matches the comm.

                Image 1 shows the leading edge of P1 comm 5º on the brush. The trailing edge of P1 has still to sweep 30º to be in the same position. The coils are energised.

                [IMG][/IMG]

                Image 2 shows P1 comm advanced by 30º. The leading edge of P1 is 5º past the brush. The trailing edge of P1 has 25º to sweep before leaving the brush. The coils are still energised.

                [IMG][/IMG]

                Image 3 shows P1 comm advanced by 30º. The trailing edge of P1 comm left the brush 5º ago. The coils are now disconnected.

                [IMG][/IMG]

                So with P1 sweeping 60º the P1C2 bisector is at +185º past the NSB and the trailing edge disconnected 5º earlier. Giving P1 comm a total energised sweep angle of 55º.

                Hopefully this clarifies what I've been saying...Hopefully highlights some flaw in my understanding...But I have to say I have studied this and studied this and I can not see an error. As long as P1 is on the brush the coils are live.

                Happy Hunting

                mark
                Mark,

                You are still not realizing what is supposed to be concern about.

                Please, let's get IDENTICAL CONFIG. CAD'S to start with.

                1-On All Images you do not have P2 Pair, Coils...plus Element...so IMG 3 means nothing, all I see is that P1 got disconnected before passing SSB (You have to move it back...remember this is about "hair" differences.

                2- Second, why are you "stepping" by 30º Frames only?...this will take place in a smooth rotation. So you could rotate smooth til reaching just a "hair" off...Meaning the perfect contact, no contact.

                3- Please, Be very CONSISTENT about setting of Commutator Elements related to Rotor Poles -Coils.

                In your first Diagram that I uploaded before you had P1 Element passed the P1C1 last pole, actually in the slot after.

                Now you have them between pole 3 and 4 slot...??

                Do you believe this does not matter?...so everywhere you set them (elements connected to pairs)...then by keeping the brushes at same place it will do same results?


                look at my CAD, I have set them exactly at the center of pole, not at slot...let's first get on same page, please.


                Thanks


                Ufopolitics
                Principles for the Development of a Complete Mind: Study the science of art. Study the art of science. Develop your senses- especially learn how to see. Realize that everything connects to everything else.― Leonardo da Vinci

                Comment


                • Hi UFO

                  I'm sorry that I have not been able to demonstrate the principle that the coils connected to a comm element are energised for a 'hair' less than 60º. Being the angle between the comm leading edge entering the brush and the comm trailing edge leaving the brush.

                  I shall respectfully withdraw from the discussion to avoid further disruption to your thread.

                  With very best regards and thanks for all your effort in coaching me through this extremely important subject.

                  I shall continue to tinker and realise my 120 tooth sprocket project.

                  Always Hunting

                  mark

                  Comment


                  • Originally posted by HuntingRoss View Post
                    Hi UFO

                    I'm sorry that I have not been able to demonstrate the principle that the coils connected to a comm element are energised for a 'hair' less than 60º. Being the angle between the comm leading edge entering the brush and the comm trailing edge leaving the brush.

                    I shall respectfully withdraw from the discussion to avoid further disruption to your thread.

                    With very best regards and thanks for all your effort in coaching me through this extremely important subject.

                    I shall continue to tinker and realise my 120 tooth sprocket project.

                    Always Hunting

                    mark

                    Mark,

                    This is what I was referring to:

                    [IMG][/IMG]

                    On left was all your original basic rotor-commutator structures during all your prior wrong testing, look at your Commutator Diameter, and then...

                    Look at your latest (yesterday) design on right...You drew the Commutator and Brush in a completely different scale, much bigger this time while keeping the same rotor diameter...

                    Also, in this later CAD, you "decided" to set the P1 Commutator Contact Element..."in another place"...messing up the whole timing that you had established before.

                    And of course, P2 is missing...what for right?...just with P1 alone proves your "point".

                    This is called "INCONSISTENCY" on CAD's design....out of scale models and all relating to the SAME, EXACT Structure, and of course the later model is going to "BENEFIT" what you are claiming having an issue, a problem with...right?

                    Take a look at Picture below Mark:


                    [IMG][/IMG]


                    I am pretty sure you knew about all this right Mark?...so, do you think it would be EXACTLY the same to sweep Commutator Element-Brush at left as the smaller one at right?!

                    Of course not!...smaller circumference switching plates/brush are going to turn on-off faster than wider area switching at left image.
                    AND BOTH WITH SAME EXACT 30º ANGLES, AND TURNING THE SAME ROTOR DIAMETER.

                    That was the reason why I asked previously about getting into "the same page", a SCALED EXACT CAD MODEL to run all this switching, otherwise you and I are WASTING OUR TIME HERE!!!

                    And then You "Fly away"...

                    You did an excellent job Mark!


                    One thing that caught my attention...was the fact that even being warned by me and many other Members here WAY BEFORE, YOU KEPT GOING with the WRONG SETTINGS...building all your "Beasts #"...right?


                    No matter I told you many, many times there WAS SOMETHING VERY WRONG WITH ALL YOUR SETTINGS.

                    But NOPE...You built several, I mean several Models WITH A CONTINUOUS "BRAKING OPTION INCLUDED" in the package, and VERY CAREFULLY TEST THEM ONE BY ONE...just to prove ALL OF THEM WERE A MERE FAILURE.

                    So Asymmetric Machines are a complete FAILURE...a waste of time.

                    Then you turned into the very old one commutator arrangement motor...and yes, vualá...it WORKED GREAT...better than ALL ASYMMETRIC ONES!!!

                    The only thing your tests triggered very well...was all the BS that merged here...all "My Old Friends" stepped in to finish the "Grace Shot"...


                    All this crap just consumed some of my sweet and valuable time...again.


                    So Mark, excellent job you did here...thanks a lot!


                    HOWEVER, I am STILL HERE, CONVINCED MY Machines are FAR SUPERIOR THAN ANY "OEM" OUT THERE IN THE SYMMETRIC WORLD...No matter what ANYONE have to say about them.


                    I just don't have time to be wasted on crap like this anymore.


                    Adiós, keep hunting for the "next catch"...


                    Ufopolitics
                    Last edited by Ufopolitics; 04-14-2015, 02:09 PM.
                    Principles for the Development of a Complete Mind: Study the science of art. Study the art of science. Develop your senses- especially learn how to see. Realize that everything connects to everything else.― Leonardo da Vinci

                    Comment


                    • Hi UFO

                      I have not 'flown away'.

                      I thought it was right and best to not continue to argue a point on timing which I well understand and so I retired graciously from the discussion to avoid detracting from the excellent work from you and all the other hard working people that give their time and effort freely to promote this important work.

                      I'm disappointed to see the other things you have said about me and my work here but will not defend or justify it here as I believe it would not be correct to do so.

                      It is however an extremely important foot note that I must make. I have never stated or implied your Asymm design is a failure. I would not have spent so much time trying to replicate it if I believed that. If there is any failure, it is mine. I tried and failed to replicate your design. That is all that has happened.

                      As I say, I will continue to try and replicate your work in my efforts to develop a different scooter/dirt bike platform.

                      I wish you the very best in this and every project.

                      With best regards

                      mark

                      Comment


                      • Stalling electric motors

                        @UFOPolitics
                        Raul thank you for your quick help on the part number for the wedges it is greatly appreciated. I have completed over a hundred timing tests with 4 different windings and am digesting the results now. I have tested the motor pairs, the generator pairs and the both of them under power. I have had to rewind and repair rotors and now have a bank of proof to put together in the form of movies on each winding. The results have been more instructive than I ever would have thought they would be. Truly the all north in all three configurations that I have wound have out performed the symmetrical oem version of the goldmine motors. The problem that most have with these motors in my opinion is the lack of patience to truly apply a scientific method to their research. It is not enough to just put one together. Do you think it was easy for the early researchers to come up with the amazing results they did over a hundred years ago. No they worked constantly on their models until they came up with consistently reproducible results. I am reminded of the early hot rodders that were on every street corner when I was growing up. Taking their stock engines, polishing and porting the valves, reworking the cam timings and carburetion. Trying to get that last little bit of performance out of each model.
                        I have another day of testing before I am finished and then I will try to publish the videos based on all of these findings so others can see for themselves the amazing results that I am seeing.
                        Raul I would like to consider with you the problem of torque testing where an electric motor is brought to a stall. I think that most of these tests were developed for steam and gasoline engines and not electric motors and the tests themselves are destructive for a high performance electric motor. When you stall an electric motor you are creating a short across the motor winding that the brush pair is feeding. As you are aware our motors are capable of carrying much higher amounts of voltage and amperage than the oem motors are in every situation except one, A Dead Short which occurs at stall. The only way these motors should ever be tested to a stall is with a circuit breaker installed or fuse to protect the motor against a dead short situation. Better to replace a fuse or reset a breaker than rewind a motor. Just food for thought.

                        Cheers

                        Garry
                        Last edited by GChilders; 04-15-2015, 12:31 AM.

                        Comment


                        • Tank Circuits

                          @Sampojo
                          Sorry I didn't get back to your question earlier. The method that I was discussing and will be testing after the timing tests are finished and the videos are edited and released will be a type of tank circuit that UFO has been demonstrating on many of his applications. The first time that I saw it was on his cold electricity coil. In the other thread at the beginning this was used. I have looked at this and John Bedini's method of charging batteries with the SSG charger and have seen a similarity in the two. In addition to this I have replicated and built several solid state chargers Imhotep's which I know you are familiar with and the Tesla Switch which was developed by a contemporary of Tesla, Ron Cole. There have been various successful replications of this device which seems basic in it's concept but most agree that the timing is somewhat difficult to accomplish. Electrodyne Corporation had a successful replication with a mechanical switching device and Bedini successfully replicated a solid state device. I am experimenting with a new take on merging three methods to collect energy from the bemf of the pulses that we use for powering the motor, into a bank of capacitors. I have a couple of tests in mind that I have tested that demonstrate why PWM is inferior to incremental increases in frequency. This is still experimental and I will demonstrate how that once you move the motor above the 50% duty cycle in the pwm controller the coils start generating more heat and actually stop generating electricity through the bemf. The coils at the top of the duty cycle range become so charged with current that other coils are becoming inductive. This could be collected and recycled but there is a loss of energy due to the motor coils becoming extremely hot. I will go over this in more detail prior to the tests.

                          Cheers

                          Garry

                          Comment


                          • Originally posted by GChilders View Post
                            @UFOPolitics
                            Raul thank you for your quick help on the part number for the wedges it is greatly appreciated.
                            Hello Garry,

                            My pleasure friend, it only took me the time to get the box, write number and post it...minutes of time.


                            I have completed over a hundred timing tests with 4 different windings and am digesting the results now. I have tested the motor pairs, the generator pairs and the both of them under power. I have had to rewind and repair rotors and now have a bank of proof to put together in the form of movies on each winding. The results have been more instructive than I ever would have thought they would be.
                            Patience makes "Magic" works...

                            I really appreciate all you are doing here by yourself Garry, but am sure it is very rewarding to see the great results obtained...the power of learning is one of the best capability we own...but sharing what we've learned and experienced is the sky in itself within Us.

                            Truly the all north in all three configurations that I have wound have out performed the symmetrical oem version of the goldmine motors.
                            Yes Garry they all do...I knew that the first time I started playing with the "extended" versions from the first one I made a few years back...the Three Pole Asymmetric.

                            There is a "basic knowledge" required about Magnetism and Ferromagnetism Influences/Exchange properties... in order to understand the reason why the all North work so beautiful...but I will explain that in my other Thread coming soon...

                            The problem that most have with these motors in my opinion is the lack of patience to truly apply a scientific method to their research.
                            Patience is essential...however, We keep looking at our watches...and patience vanishes then...Time rules everything, but we have to think for the Future by "sacrificing the present"...it is the only way, then realize we have enough time to finish it...

                            It is not enough to just put one together. Do you think it was easy for the early researchers to come up with the amazing results they did over a hundred years ago. No they worked constantly on their models until they came up with consistently reproducible results. I am reminded of the early hot rodders that were on every street corner when I was growing up. Taking their stock engines, polishing and porting the valves, reworking the cam timings and carburetion. Trying to get that last little bit of performance out of each model.
                            The very rewarding point comes in when you find that "key" to make it work beautiful...then, it it could be reproduced over and over...and exact same successful results...isn't it worthy?...I believe it is.

                            Yes, the old machines...to get them in right timing is a real pain in the neck...I have worked there...I have replaced timing chains, sprockets...distributor shafts...guides, etc...I have rebuilt so many carburetors...Webber, Holley...Two and Four Barrel...rebuilt Electronic Diesel Fuel Pumps, Heads removal and Replacement...I know almost everything about Fuel Engines friend...and just a "hair" off ...and the thing will start misfiring like crazy...or the whole thing could collapse, just because of a miss calculation...and boom...gone...right?

                            I have another day of testing before I am finished and then I will try to publish the videos based on all of these findings so others can see for themselves the amazing results that I am seeing.
                            I am pretty sure many here are expecting that precious moment Garry...as I can tell about myself as well...


                            Raul I would like to consider with you the problem of torque testing where an electric motor is brought to a stall. I think that most of these tests were developed for steam and gasoline engines and not electric motors and the tests themselves are destructive for a high performance electric motor. When you stall an electric motor you are creating a short across the motor winding that the brush pair is feeding. As you are aware our motors are capable of carrying much higher amounts of voltage and amperage than the oem motors are in every situation except one, A Dead Short which occurs at stall. The only way these motors should ever be tested to a stall is with a circuit breaker installed or fuse to protect the motor against a dead short situation. Better to replace a fuse or reset a breaker than rewind a motor. Just food for thought.

                            Cheers

                            Garry
                            I agree with you 100% Garry, these old and primitive methods of taking Engines to stalling is simply ridiculous!!

                            On my whole research I have found a very simple method...and I have tested like that and it has worked out perfectly well.

                            Just "replace" the asymmetrical motor within an specific appliance or tool or equipment...vehicle, etc...that do some work...a drill, a weed-eater...a scooter...any electric vehicle...including a Golf Car...an R/C Toy...whatever can render some "performance" and then compare...OEM, versus Asymmetric...then you will see the "magic" during the testing...it is simple, just got to find the right tool, or vehicle, equipment, appliance, etc to house both motors without major complications, easy R&R...and the rest is just filming it and enjoying the show...

                            When we stall a larger number of coils machine...in a stop...just the circuit at short will burn out...like an Imperial...28 slots...56 Coils in Pairs...burn Two Pairs 180º across with two inputs On, and still keep enjoying the other 54...now do that with a symmetric Imperial...and watch the whole thing get on fire ......say it was connected on a Bike...just push it out of that burnt sequence and ROOOAM...is on again...it will take you to the destination....but it is not the way though...I agree.

                            Garry, my best regards to Members like You here!!...it does not matter if is just one who makes it through success...a million will watch and learn from your work alone!

                            Looking forward to see those videos my friend!


                            Cheers


                            Ufopolitics (but You could call me Raúl...)
                            Last edited by Ufopolitics; 04-15-2015, 04:44 PM.
                            Principles for the Development of a Complete Mind: Study the science of art. Study the art of science. Develop your senses- especially learn how to see. Realize that everything connects to everything else.― Leonardo da Vinci

                            Comment


                            • Looking for test data

                              Originally posted by sampojo View Post
                              Furthermore, Ufo's Post 3132 seem to disprove conventional wisdom. Anytime more energy can be garnered as in an open system, it would actually disprove the conventional wisdom that the rules of conservation of energy apply to the electric motor, as a closed system.
                              Hi Sam,

                              I am particularly interested in tests which have been documented so I watched that one from post #3132 several times. I noticed a discrepancy in the manner in which the input current was measured. Subsequent posts confirm that the current measurement was flawed and the test was invalid.

                              Can you provide links to other tests which have been run where input and output were measured while under load?

                              You also mention the test done on one of these machines at Imperial Motor Company. I cannot find any results or documentation relating to that except for some mention of commutation problems and the machine being returned. Were there ever any data taken there?

                              Thanks, from a new guy,

                              bistander

                              Comment


                              • Originally posted by bistander View Post
                                You also mention the test done on one of these machines at Imperial Motor Company.
                                Hi bistander

                                The post with most of the confusion around testing is in UFO's post #7338 which is number 6 in the sequence of the history to the event.

                                Happy Hunting

                                mark

                                Comment

                                Working...
                                X