Announcement

Collapse
No announcement yet.

Re-Inventing The Wheel-Part1-Clemente_Figuera

Collapse
X
 
  • Filter
  • Time
  • Show
Clear All
new posts

  • Because of my workload, I do not have too much time to spend at the forum. I just wanted to give you an update of the experiments I am performing. I will continue running more tests for the following two weeks. I have not yet tested the secondary coil with a load. First, I want to maximize the design of the primary circuit.
    Please, refer to the following link for the images: ImageShack Album - 7 images
    IMAGE No. 1:
    Shows the setup that I am using: the Arduino controller, the breadboard with the driver, the seven resistors (200 ohms each), and the primary and secondary coils.
    IMAGE No. 2:
    Shows two 50Ω/50W resistors used as dummy loads to replace the primary coils.
    IMAGE No. 3:
    Shows the output voltages dropped across the two 50Ω/50W dummy resistors replacing the primary coils. Each scope probe is set at x10. Notice that the small voltage steps are followed by a large jump in voltage. The frequency of the voltages is about 68Hz
    IMAGE No. 4:
    Shows the setup of IMAGE #3 but with seven 10 ohms resistors instead of the 200Ω. The scope probes are set at x1. Notice that the voltage steps are better defined.
    This is an important design criterion to be applied when using the resistors as shown in the patent. The value of the resistors must be optimized for the impedances of the primary coils. If the resistors are too high the voltage steps are small and large at positions 1 and 8 as shown in image 3. On the other hand, if the resistors are too small, the DC component of the primary current would be too high, which increases the primary current considerably.
    IMAGE No. 5:
    Shows the setup of IMAGE #4 but with the primary coils connected instead of the dummy resistors. No load is connected at the secondary coil. There is no DC voltage component at the coils, as expected. The controller and the driver are working fine because there are no voltage spikes. The transitions of the power transistors are make-before-break. The scope probes are set at x10.
    When the loads are pure resistive as in IMAGE #4, the minimum and maximum values of the voltages occur when the transistors at positions 1 and 8 are on. When the primary coils are connected, the minimum voltage value occur at about positions 3 and 5.
    IMAGE No. 6:
    The top graph corresponds to the voltage drop across a primary coil with no DC component. The scope probe is set at x10. The bottom graph represents the current flowing through the same coil and corresponds to the voltage drop across the 0.25 Ohms resistor used as a shunt resistor. There is a DC component. The first x-axis from the bottom corresponds to zero voltage. The scope probe is set at x1. A design goal should be to minimize the DC component applied to the primary coils. Notice that even though the voltage applied to the coil changes in steps, the changes of the current through the coil is smooth. As expected, the current in an inductor cannot change instantaneously.
    I am giving you some test bench information that can be helpful for constructing the model.
    Wonju-Bajac
    PS: this will be my last reference to the issue of the resistors being used as a current splitter and/or the phase shift of the primaries. I just wanted to provide an analysis of a current splitter using six (6) resistors as shown in image 7. The results of the calculations indicate that the sum of the two currents is not always a constant when using resistor loads. But, with the primary inductor coils, it could be a different story.

    Comment


    • Originally posted by wonju View Post
      Wonju-Bajac
      PS: this will be my last reference to the issue of the resistors being used as a current splitter and/or the phase shift of the primaries. I just wanted to provide an analysis of a current splitter using six (6) resistors as shown in image 7. The results of the calculations indicate that the sum of the two currents is not always a constant when using resistor loads. But, with the primary inductor coils, it could be a different story.
      @ Wonju

      Oh, what can I say hmm...
      Referring to your calculations shown in image 7:


      Have you ever heard of Kirchhoff's circuit laws??

      I'll be brief:
      "The principle of conservation of electric charge implies that:
      At any node (junction) in an electrical circuit, the sum of currents flowing into that node is equal to the sum of currents flowing out of that node" WIKI

      Do you know how to calculate resistors in series, parallel etc?

      Your calculations are wrong, sorry...


      humble electronics technician...
      kEhYo
      Last edited by kEhYo77; 12-09-2012, 07:15 AM.
      “ THE PERSON WHO SAYS IT CANNOT BE DONE SHOULD NOT INTERRUPT THE PERSON DOING IT ! ”

      Comment


      • Well, I don't understand why the primary coils themselves couldn't be the resistor segments in the same time ?

        Comment


        • Cotrrect waveform

          Originally posted by kEhYo77 View Post
          Hi Patrick.

          It is still symmetrical on the imaginary axis placed at the half of the intensity scale. Those half value resistors at the end will only smooth out the minimum and maximum peaks, the rest of the signal has a gradual and linear tendency to rise and fall. If Figuera had bigger commutator with more segments he would probably use it instead of this one which doesn't divide the current in precise halves due to the limitation on the number of segments.

          Don't shoot the messenger!

          kEhYo
          Actually, it isn't symmetrical, nor is it the shape which you indicate (ignoring the variations caused by the rate of rotation of the wiper arm, the width of the stator segments and the value of each fixed wire-wound 'resistor').

          You are omitting the effect of stator contacts 1 and 16 being connected and contacts 8 and 9 being connected, giving a double period of time at that resistance setting.

          You are also omitting the effect of the last wire-wound resistor on the right being only half the length of the others, which has the effect of a step increase of current which is only half the intensity of the other steps. There is only one half-value resistor, not two.

          Yes, the stepped rising slope and the stepped falling slope are approximately linear, but due to the actual shape of the top and bottom sections, the resulting waveform is certainly not a sawtooth shape and it needs to be borne in mind that the waveform has an offset and so to replicate it would require the waveform to be shifted to allow for the fact that current flows in one direction through both primary windings at all times and never hits the zero as a sawtooth or sinewave would do.

          The actual waveform is shown here. Replications should be producing the actual waveform implemented by Figuera rather than imagining some other way which is supposed to be 'better' or 'easier' or 'theoretically wonderful'.

          There is no point in talking about hypothetical mid points as this is the actual circuit of an actual device and it does not have hypothetical points, just real points as specified. Replication, means building one the same. It does not mean building one which is different.

          Patrick
          Attached Files

          Comment


          • Patrick, I agree.

            That is why I started to question Wonju's 'ought to be' input wave forms in the form of half-sinusoids in his pdf. As they deviate too much in his interpretation.

            The trace from your attached picture is right, my no 1 is close, as I didn't notice that half value resistors that smooth out the peaks of minimum and maximum by doubling the contact BUT I correctly deduced an ideal, analog type trace in contrast to this digital 4-bit approximation. Two, clean sinusoids shifted 180 degrees on the input = clean AC on the output. I've tested it and it works producing clean AC on the output and I am certain that is what Figuera had in mind designing this one of a kind inverter.
            Last edited by kEhYo77; 12-09-2012, 05:10 PM.
            “ THE PERSON WHO SAYS IT CANNOT BE DONE SHOULD NOT INTERRUPT THE PERSON DOING IT ! ”

            Comment


            • A hidden detail?

              As we have seen with only one brush is not possible to get a constant total current (IT = I1 + I2 ) to both electromagnets. But ....

              Literaly in 1908 patent: "the turning of a brush or group of brushes which move circularly around the cylinder “G” ..."

              What about if Mr. Figuera designed the system with two brushes touching the opposite contacts of the cylinder?. Then you will have current in two simetric contacts and, therefore, you can get a simetrical variation of the current (triangular wave) and achieve that while one signal is increasing the other is decreasing the same amount. So, both signals will be opposite and, the sum of both signals will be constant.

              Can you skip the Lenz' Law of you maintain constant the total current ?...

              Or if maybe Mr. Figuera could have designed two cylinder stuck to each other with two series of contacts ...See the attached sketch.

              Please think about it and comment!!
              Attached Files
              Last edited by hanon1492; 12-10-2012, 11:30 AM.
              https://figueragenerator.wordpress.com/

              Comment


              • Resistive divider and Inverter amplifier

                The theory of resitive dividers which is behind the system used by Mr. Figueras to change the intensity:


                Inverting Amplifier: It is a type of an All-pass filter which inverts and scales the input signal. ( Is it needed to invert an AC signal?).

                Inverting Amplifier


                Operational amplifier - Wikipedia, the free encyclopedia
                Last edited by hanon1492; 12-13-2012, 12:16 AM.
                https://figueragenerator.wordpress.com/

                Comment


                • Any sucessfull replications so far ?

                  Or we came to dead end ?

                  Comment


                  • Test Date 12/15/12

                    My experiments are moving slowly because I am building more coil sets of the transformer. I have not tested the circuit for over unity, yet. However, I did short circuit the secondary coil with a screwdriver and sparks were generated melting the wires to the screwdriver. The most interesting thing is that a change in the total primary current was not noticeable.
                    Refer to the following link for more images:
                    ImageShack® - Online Photo and Video Hosting
                    IMAGE_No.8:
                    Shows the equipment setup. Heat sinks were added to the IGBTs. I also built a variable DC voltage power supply.
                    IMAGE_No.9:
                    Shows the reference x-axes channel 1 (above) and channel 2 (below).
                    IMAGE_No.10:
                    Shows the voltage of a primary coil (channel 1) and the total primary current Ipn+Ips (channel 2). NOTICE THAT THE TOTAL PRIMARY DC CURRENT IS NOT CONSTANT!
                    Channel 1 => 10V/Div
                    Channel 2 => 4A/Div
                    The conditions for the testing are:
                    Power supply Vdc = 25.30V input; Vac = 15.45Vrms; Iac≈1.30A input; primary turns = 100t; secondary turns = 219t.
                    Resistors:
                    8Ω/20W, 10Ω/10W, 10Ω/10W, 10Ω/10W, 10Ω/10W, 10Ω/10W, 8Ω/20W,
                    IMAGE_No.11:
                    Shows the secondary output voltage
                    Channel 1 => 20V/Div
                    %%%%%%%%%%%%%%%%%%%%%%%%%%5
                    I will keep you posted.
                    Wonju
                    Last edited by wonju; 12-16-2012, 01:42 AM.

                    Comment


                    • Small distance between electromagnets

                      Patent 1902: "Several electromagnets are arranged opposing each other, and their opposite pole faces separated by a small distance"

                      "As much as we take, as a starting point, the fundamental principle that supports the construction of the Ruhmkorff induction coil..."

                      Patent 1908: Just one wire connect each induced coil in the drawing

                      "Between their poles is located the induced circuit represented by the line “y”
                      (small)."

                      Rumhkorff coil: "...The secondary coil is wound in many thin flat pancake-shaped sections (called "pies"), connected in series..." (source: Induction coil - Wikipedia, the free encyclopedia )

                      Pancake style coils are good candidates to get a small distance between the electromagnets (as Tesla used in his Transformers)

                      Last edited by hanon1492; 12-16-2012, 01:50 AM.
                      https://figueragenerator.wordpress.com/

                      Comment


                      • My test

                        Test: two electromagnets (150 turns, wire 0.4 mm, 7 cm length) and one induced coil (100 turns and 1 cm length, grounded) placed in line with the axis between the two electromagnets. Input current to electromagnets: AC 12 V, 50 Hz, 1.8 A. All the coils are built with soft iron, 2 cm diameter. The three cores are in line separated by a thin insulator. See image


                        By now, there is no sign of OU (induced coil output: after passing the current through a diode bridge to convert it to DC, 0.95 V DC, 0.14 A)

                        With a induced coil with 900 turns (6 cm length) I got higher values: 1.9 V and 0.19 A, and I noted that small increments in the distance between coils core made big changes in the induced current. If the induced coil was located perpendicularly to the axis line between electromagnets the induced current was zero.
                        https://figueragenerator.wordpress.com/

                        Comment


                        • Hi Wonju

                          Thank's very much for sharing your results.

                          In image 10, i notice that the voltage is also strongly negative at the end of the cycle.
                          I got also this kind of result and it seems that the intensity of this negative voltage, is depending of the relation from resistors and coil winding. It is anyway very difficult to get a step up and down voltage which remain always in the positive side.
                          And my question is why? Is this due to a hidden (or delayed ) flyback spike , or is it due to the interference of the other primary. ?. Or other ?
                          Keep up the good work

                          Hi Hanon

                          Good testing thank's for sharing

                          good luck at all

                          Laurent

                          Comment


                          • A simple test to avoid reaching zero current

                            Hi all,

                            In 1908 patent the voltage never drops to zero. Here it is a method to avoid having zero current during the switching time in a scheme similar to the one in the 1902 patent, in case this may be the key:


                            As a switch element I have used a relay. Any other suggestion for the switch element?

                            My main doubt: is it only necessary one signal to both electromagnets? or, do we need two different signals , one for each electromagnets?
                            https://figueragenerator.wordpress.com/

                            Comment


                            • GEGENE project based on Figuera´s concepts

                              JLNaudin has released a new device he is working on which is very similar to the induction concepts of Clemente Figuera

                              Here's the link: The GEGENE : a Great Efficiency GENErator with a Tesla bifilar coil...

                              Video with a test: GEGENE Tested at full POWER - YouTube


                              Results:
                              Input: 1900 W
                              Output: 3550 W
                              https://figueragenerator.wordpress.com/

                              Comment


                              • Dimmer as pulsing device

                                Hi,
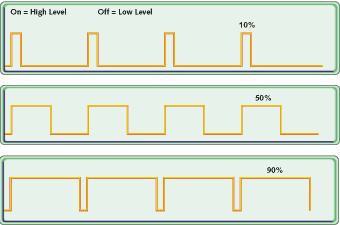
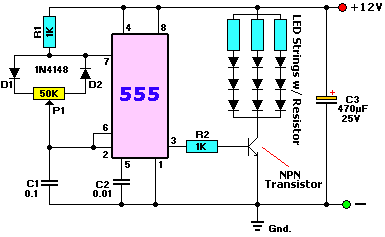
                                Currently I am building a LED dimmer circuit (PWM, Pulse Width Modulation) to implement the switching device which creates the pulses. It is very cheap, around 4 € to buy all the components. I will be able to test different frequencies just by adjusting the potenciometer. I will also test at high frequencies. The final device is also sold in internet at some electronic sites.

                                LED Dimmer Circuit - Lighting


                                As NPN transistor I am using a 2N3055 which can handle up to 60 V, 15 A and 115 W.

                                Edit: Please see post #276 which is an appendix to this post, because I realized that PWM is not the proper circuit to regulate the frequency of the signal.
                                Last edited by hanon1492; 01-21-2013, 10:40 PM.
                                https://figueragenerator.wordpress.com/

                                Comment

                                Working...
                                X