Announcement

Collapse
No announcement yet.

Barbosa and Leal Devices - Info and Replication Details

Collapse
X
 
  • Filter
  • Time
  • Show
Clear All
new posts

  • Hello Bi,

    This is really funny.

    I suggest a simple transformer also and even told Clarence about using them in radios. But that idea got jumped on big time just like your idea.

    So BM who never reads anything already posted then posts a circuit that has TWO transformers and a whole lot of other junk. Talk about a lack of comprehension.

    Take care,
    SisMika

    Comment


    • What's really funny is that you hot shots never post a working circuit.
      Cut with the arm chair command post told ya so and post
      something that shows you know enough about this to be
      dangerous. Til then it's just parroting flow charts from your school
      books. Teacher told me kind of stuff.

      Show me a practical well thought out functioning circuit and
      try to explain yourselves a little, all of this mumbling and
      grumbling is silly.

      Can't you guys come up with anything? Even a divider or anything
      on paper? All these little digs about you told me so and you are
      to afraid to give an example?

      It's okay guys don't be afraid. So far no one has any idea
      what is in your heads unless they are clairvoyant.

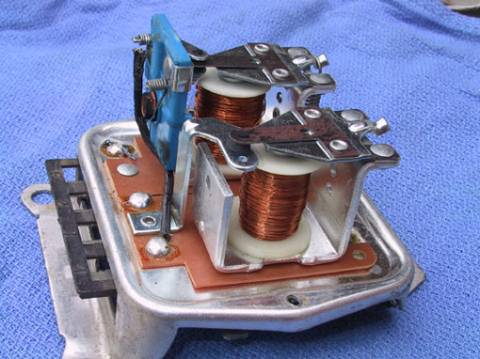
      I'm old enough to have had a relay on my car as a regulator.
      The voltage regulator on the 60's cars used this format and
      I would pop the cover after drilling out the rivets (voiding
      the warrantee )and file the point contacts clean again.

      It used to be the way alternator voltages were regulated
      going to the battery. If I find the circuit, do you want me to
      email it privately so you have something to show the group?

      Originally posted by SisMika View Post

      So BM .............. then posts a circuit that has TWO transformers
      You can't just hang a transformer on the unit.


      Last edited by BroMikey; 01-07-2016, 09:58 PM.

      Comment


      • Connecting battery charger

        Back on post #982, Clarence has an output from the rectifier. Take the plug on the switch mode battery charger and connect one pin to the rectifier positive and the other pin to the rectifier negative. Connect the charger output to the battery. Do you really need a diagram?

        Comment


        • Originally posted by bistander View Post
          Back on post #982, Clarence has an output from the rectifier. Take the plug on the switch mode battery charger and connect one pin to the rectifier positive and the other pin to the rectifier negative. Connect the charger output to the battery. Do you really need a diagram?
          Yes, you need a diagram so that after you look at it awhile
          you might have time to change your mind. Remember system
          topology for modern day switch mode smart chargers are not
          designed to deal with any variance from line. Not designed
          to deal with spikes, not designed with HIGH FREQUENCY rectifiers
          not setup to protect the mirco's against spiking.

          I have a trash can full of that garbage (my own personal take) of
          digital circuits that couldn't cut the mustard. Now if you want to
          rebuild all of the safeguards in between THE UNIT and the tap point
          on the smart charger, be my quest.

          Add it all in, suppression and so on.

          I have a smart charger right here that popped and the chips
          are all sub-minature. Robots mounted everything and is possible
          to repair.

          Let me see your diagram. You guys catching on yet?

          I like those fast diodes for High Freq's.

          Those tin boxes I posted are said to be able to handle over
          voltages well.
          Last edited by BroMikey; 01-08-2016, 01:33 AM.

          Comment


          • Battery charger

            Originally posted by BroMikey View Post
            Yes, you need a diagram....
            Here's a diagram for you. There are hundreds; just use google.


            Originally posted by BroMikey View Post
            Remember system
            topology for modern day switch mode smart chargers are not
            designed to deal with any variance from line.
            120 to 370 VDC includes a good amount of variance. The battery charger with the specification in the following link can be bought for less than the price of three 10MΩ resistors. Clarence shows a FWBR and filter capacitor. I don't see where this wouldn't work for him, but it might not. Just trying to help the guy out.

            https://www.trcelectronics.com/ecomm/pdf/gc120.pdf

            bi
            Last edited by bistander; 07-22-2020, 04:13 AM.

            Comment


            • Let me update you all on Clarence work if you have not
              understood the additional device added to his captor.

              The captor gives AMPS and at present his captor toroid device
              connects to 60 grounding rods where extra energy is claimed.

              Next you should have realized that Clarence wanted 2 other
              things out of his power unit

              1 being to recharge the batterysufficiently enough that the
              source battery would not drop down during a 12 hour run.

              2 that a 240vac output be possible.

              Right now as we speak Clarence uses his captor and his ZVS driver
              to a stranded copper wire in the shape of a pancake. This section
              of stranded wire has tin on each strand and the collection of strands
              is a 6AWG cable.

              The ZVS unit powers the 6 AWG wire at high frequency at 4.1 volts DC
              and requires a 24vdc supply. The supply is plugged into the captor
              inverter and feeds the ZVS the needed 24vdc.

              I couldn't wait for all of the final results so I gave him a ring It's
              been bugging me how he has it all connected but I will give you
              some output too, in a minute.

              Next the 6 awg pancake is slapped on the back with another coil set
              that gives the 120/240vac output needed for operating home devices.
              This new slap on the back is in the form of the TBC aka
              (TESLA BIFILAR COIL) for those who didn't know.

              The TBC is made of the same copper stranded wire that is tinned
              so remember that it is very important. Tinned wire is a cheap substitute
              for silver coated wires and gives nearly the same result. Skin effect
              is what we are exploiting here.

              Okay the TBC is stranded also and the collection of strands equal
              10 AWG.

              Let me cut short:

              The battery is a sealed Lead Acid 70ah at 12vdc. This battery can not
              supply all of the current to power a set of heat lambs used to heat a
              room totaling 750 watts for 1 hour.

              750watts/12vdc=62amps and the battery is simply incapable of doing
              that. The battery could not sustain a 62 amp load for 30 seconds yet
              the 12.5 volt battery runs those heat lamps brighter than wall power
              for 1 hour when the battery voltage reaches 11vdc.

              This is because the circuits are not finished and no battery charger
              is working like before the system augmentation. It's coming around.

              I told Clarence many people have those 3 wheel carts that require
              150-250watts to run around with like the Walmart has using a
              50-70ah battery but most of those are either 24vdc of 36vdc.

              He is using a single 12vdc battery and on a C20 scale of a 70ah
              battery means we must do the math like this 70ah/c20= 3.5amp
              capable but no battery can give up it's entire store so the figure
              is even lower. In real applications a 70ah battery is only good for
              66 percent of the total sticker rating.

              This is found by 70ah X .66 = 46ah true rating and to get that
              is as follows..... 46ah/C20= 2.3 amps this means no more than
              2 amps or more can be used for extended use to get a full 20 hours
              of use.

              These golf carts and electric grocery carts are geared way down
              for power not speed but if used like scooter will last only one
              hour are so.

              So maybe you can see my point. Even now without self sustaining
              battery recharging systems that will be replaced with super cap
              starter banks that will increase output more, the home brewed
              invention gets more out than is put into it.
              Last edited by BroMikey; 01-17-2016, 11:27 PM.

              Comment


              • Really good post, love every single parts on it, when yo talk about the 2 TPC induction coil, and 2 TBC the wire size is 10 AWG or 6AWG? I still have the same question how will connected to the captor, I hope this altruistic man will find the way. Best wish for you.
                Attached Files
                Last edited by fer123; 01-17-2016, 11:23 PM.

                Comment


                • Originally posted by fer123 View Post
                  Really good post, love every single parts on it, when yo talk about the 2 TPC induction coil, and 2 TBC the wire size is 10 AWG or 6AWG? I have question how will connected to the captor, I hope this altruist man will find the way. Best wish for you.
                  I have some additional information for all Captor Builders.
                  This device taps AMPS on one end and VOLTS on the other side
                  contrary to what we have been taught as a good power burning
                  topology.


                  The actual input voltage to the coils is a steady input of
                  4.17 volts to each of all the coils. the input to the large
                  TPC coil is 41.7 vac + from the ZVS to each of it's two sets
                  of 10 turn windings which makes it's magnetic flux pass
                  4.17 vac to all of the coils that are placed near it.


                  I have some pictures here for you that shows how much time
                  and effort this unit has taken. I have other pictures but this is
                  all you get today.

                  I really love this build

                  The first 3 are known as TESLA BIFILAR COILS or TBC

                  The very small TBC is being used as a battery charger loop.
                  If I have more time I would tell you about the special charging
                  network to lower the Battery Charing small TBC voltage so
                  as to regulate energy back to the source.

                  That is all specialized and a completely different subject to
                  tackle. But ya know me, I ain't-a-gonna let up.


                  This one is TPC or TESLA PANCAKE COIL


                  ALL COILS FOR STACKING
                  Last edited by BroMikey; 01-17-2016, 11:37 PM.

                  Comment


                  • Lot of work and time invest, congratulation. Mr clarence must invest years. I will be connected and intrigue at the same time how everything will surprise us. Thanks.

                    Comment


                    • Shelling Out the Green Stamps

                      Don't forget the large copper lead wire on the 60 copper rods
                      when you are figuring the price tag. Better go to the bank
                      or pray that your ship comes in.


                      Comment


                      • Originally posted by BroMikey View Post
                        Don't forget the large copper lead wire on the 60 copper rods
                        when you are figuring the price tag. Better go to the bank
                        or pray that your ship comes in.


                        Remind me why the ground system cannot be composed of cheaper iron or aluminum.


                        Your welcome
                        CANGAS

                        Comment


                        • Past experience

                          Hello CANGAS,

                          the answer is quite simple and comes from years of experience with all three
                          mediums.

                          I dealt with grounding rod systems for many years on the farm pertaining to the miles of electric fence needed to keep the cattle and especially large bulls
                          contained within the multi-acre spread out pastures. I did try the Iron first and it did deteriorate a lot quicker than I thought it should and lost effectiveness.
                          I also tried the aluminum rod and it didn't do as good as the plain iron. it quickly made a thick coating of oxide and lost it's effectiveness also. the cooper
                          coated iron was the most effective and long lasting one out of them all and are still in service after many years of use'

                          I never used the galvanized iron rod, so that's one that I don't have experience on at all.

                          I personally don't like to have to use ground rods at all! to damn much effort and AND expense involved for certain and 60 of them was a GIANT pain in the butt!
                          that is just another one of the reasons why I have been working within the scope of the whole unit to eliminate the need for EVERYONE of them.
                          I already know the HOW and the DIRECTION and the METHOD to accomplish all of this but I live in the REAL WORLD and reality takes MY TIME which is limited the same as everyone! I have mounds of other work to do which is why you don't see many posts from me.

                          I have also learned NOT to divulge everything I know and have accomplished
                          because of the members on the forum who JUST CAN"T WAIT to jump on the
                          toilet and drop their load! their LOAD being just what you know it is!

                          not this week but maybe mid next week I hope to have a few more results to
                          post and info to give out.

                          Thanks for listening!

                          respectfully,

                          Clarence

                          Comment


                          • Originally posted by clarence View Post
                            Hello CANGAS,

                            the answer is quite simple and comes from years of experience with all three
                            mediums.

                            I dealt with grounding rod systems for many years on the farm pertaining to the miles of electric fence needed to keep the cattle and especially large bulls
                            contained within the multi-acre spread out pastures. I did try the Iron first and it did deteriorate a lot quicker than I thought it should and lost effectiveness.
                            I also tried the aluminum rod and it didn't do as good as the plain iron. it quickly made a thick coating of oxide and lost it's effectiveness also. the cooper
                            coated iron was the most effective and long lasting one out of them all and are still in service after many years of use'

                            I never used the galvanized iron rod, so that's one that I don't have experience on at all.

                            I personally don't like to have to use ground rods at all! to damn much effort and AND expense involved for certain and 60 of them was a GIANT pain in the butt!
                            that is just another one of the reasons why I have been working within the scope of the whole unit to eliminate the need for EVERYONE of them.
                            I already know the HOW and the DIRECTION and the METHOD to accomplish all of this but I live in the REAL WORLD and reality takes MY TIME which is limited the same as everyone! I have mounds of other work to do which is why you don't see many posts from me.

                            I have also learned NOT to divulge everything I know and have accomplished
                            because of the members on the forum who JUST CAN"T WAIT to jump on the
                            toilet and drop their load! their LOAD being just what you know it is!

                            not this week but maybe mid next week I hope to have a few more results to
                            post and info to give out.

                            Thanks for listening!

                            respectfully,

                            Clarence

                            Many thanks for your response. You don't know how much it encourages me.

                            My natural field being physical mechanisms, I quickly and easily get in over my head regarding electronic devices. I still don't even have a hazy understanding of the fundamental principle of your good work, BUT THAT DOES NOT MATTER. Results speak for themself!

                            I probably read but did not remember, your explanation of different ground system materials you have used and I wanted to possibly be helpful with the little bit of knowledge I have about electrochemistry and such. But you are already more than one step ahead of me. Happily so. One of the first things to come into my mind was use of copper coated iron, and you already did that, very good.

                            Very good to hear that your theoretical principle may not be bound to a ground system, at least not of the large scale used so far. You have my prayers and good wishes for your work in that direction. My own work, involving most often purely mechanical devices, has substantially been satisfactorily completed for a little while, awaiting now for assessment of world financial and political conditions to appear to provide a relatively safe window of opportunity and of course a clear signal from The Man that I have the green light to start to try to deliver it to humanity.

                            News of your work has been a delight to me because there are many circumstances in which I imagine yours to be lighter (if a ground system is not essential) and therefore more convenient to carry about. I assume that you foresee your technology could possibly be portable and mobile? (Don't give away any secrets. I can subdue my curiosity.)


                            Most respectfully
                            CANGAS

                            Comment


                            • Info

                              Hello BroMikey,

                              Been a while for sure!

                              I have attached a couple of photos of all the coil units STACKED as they should be.
                              you should notice that the two inner red & black wires on the TESLA PANCAKE COIL and the TESLA BIFILAR COIL pass up through the center of the VERY TOP TBC coil which enables all of them to set perfectly flat on each other and get the full benefit of the magnetic flux energizing them. The underneath TBC coil center wires do not pose any problem so they run straight out underneath everything and connect as needed.

                              with respect to my work on the intended battery voltage circuit using the smaller TBC coil and its output of 50 vac to accomplish this, that work was slow and back and forth at times. the first thing I found out is that using a voltage reducing method whether by my DIY or the regular voltage divider
                              resistor scenario is totally undependable when applied straight to an acv
                              source. ACV has so damn many direction paths going on at the same time
                              it will work good for a while and then it abruptly changes back and forth through the added circuit components to a pathway that it likes better and then you are screwed.

                              I finally just went ahead and rectified the voltage and THEN added the voltage divider components. I knew that DC has ONE direction and takes the path of least resistance so I figured I could deal with that a hell of a lot easier and it proved true.

                              At this point I need to pass on some new information to you about rectifying
                              TESLA type components - coils in particular!
                              This particular TBC with its output of 50 vac when rectified by my valued high dollar high voltage high frequency Diodes properly FWBR connected
                              gave an output of 92 VDC. I am sure the conventional crowd reading this are about to have s***hemorrhage. according to their old school values it should only show 70.7 . HA HA ! Tesla always gave extra.
                              Oh Well.

                              For the voltage divider I laid aside my DIY components and decided to use the commercial high Mega ohm high watt Ohmite brand resisters since all the other forum members would have to go that route anyway.
                              after using several voltage divider calculators with their recommended resistor values the the RUN results would ALWAYS turn out a lower value DC output than expected. finally on the last run with a 10.9 vdc result I decided to go ahead and use DC system any way to see if it would possibly help in any way to battery - inverter system in operation. I used my 300 watt GoPower inverehooked to a 7ah 12v small battery powering a small CFL.
                              I checked the batt voltage and noted it and then turned the unit on and watched the batt voltage and run time. when the batt voltage dropped to 11 vdc I stopped the unit. I then hooked the output of the rectified dc 10.9 vdc
                              into the batt circuit ( in the meantime it was recharged back to it's same previous dc voltage value) and restarted the unit again watching the batt voltage and run time. when the batt voltage dropped to 11 volts dc again I stopped the unit the second time. the difference in run time was about 3-4 minutes longer with the added rectified 10.9 vdc.
                              not much - but I believe it shows that the method that I am after is definitely viable.

                              so for now I simply need to perfect the resistor values to give a 14.5 to 15 vdc steady rectified voltage supply and run everything again.

                              All in all, still pushing forward! I also attach a photo to show how I wound all the coils I use. the pvc pipe for the wire coil is 3/4 " ID but the pvc pipe for the coil to wind around needs to be 1 " ID.

                              Thanks for listening BRO!

                              Respectfully,

                              Clarence
                              Last edited by clarence; 03-26-2016, 04:11 PM.

                              Comment


                              • Originally posted by clarence View Post
                                Hello BroMikey,

                                Been a while for sure!

                                I then hooked the output of the rectified dc 10.9 vdc
                                into the batt circuit ( in the meantime it was recharged back to
                                it's same previous dc voltage value) and restarted the unit again
                                watching the batt voltage and run time. when the batt voltage
                                dropped to 11 volts dc again I stopped the unit the second time.
                                the difference in run time was about 3-4 minutes longer with the
                                added rectified 10.9 vdc.
                                not much - but I believe it shows that the method that I am
                                after is definitely viable.

                                so for now I simply need to perfect the resistor values to give a
                                14.5 to 15 vdc steady rectified voltage supply and run everything
                                again.

                                All in all, still pushing forward! I also attach a photo to show how
                                I wound all the coils I use. the pvc pipe for the wire coil is 3/4 "
                                ID but the pvc pipe for the coil to wind around needs to be 1 " ID.

                                Thanks for listening BRO!

                                Respectfully,

                                Clarence

                                Wow, that is great progress MAN!!! Yes I agree and understand
                                that you did some dividers and got positive results, so now you
                                need a different resistor and or divider to get the voltage up.

                                That is awesome progress Clarence.

                                Your picture today finally made clear how you lay all of your
                                coils flat having so many leads on them.

                                Extended runtime hey it's gonna bee a sweet deal.


                                Last edited by BroMikey; 01-28-2016, 02:39 AM.

                                Comment

                                Working...
                                X