Announcement

Collapse
No announcement yet.

Lockridge Device - Peter Lindemann

Collapse
X
 
  • Filter
  • Time
  • Show
Clear All
new posts

  • Hey Guys,

    I just got my motor this one here 24 VDC 250W MOTOR, 11 TOOTH SPROCKET | AllElectronics.com.

    It has 4 magnets NSNS and a 20 slot rotor. Other than being rated at 3000RPM's its identical to the one Matt posted. So I wont be able to wind a "window motor coil" like peter suggested I'll have to wind one like I suggested a few posts ago.

    4 rotor section are the same size as 1 magnet and there's 1 rotor section width between each magnet. I'm leaning toward winding my coils over 4 sections.

    Peter and Matt what are your thoughts on how many rotor sections I should wind around?

    Mark
    Comment


    • No Problem

      Originally posted by Mark View Post
      Hey Guys,

      I just got my motor this one here 24 VDC 250W MOTOR, 11 TOOTH SPROCKET | AllElectronics.com.

      It has 4 magnets NSNS and a 20 slot rotor. Other than being rated at 3000RPM's its identical to the one Matt posted. So I wont be able to wind a "window motor coil" like peter suggested I'll have to wind one like I suggested a few posts ago.

      4 rotor section are the same size as 1 magnet and there's 1 rotor section width between each magnet. I'm leaning toward winding my coils over 4 sections.

      Peter and Matt what are your thoughts on how many rotor sections I should wind around?

      Mark
      Mark,

      20 slots is no problem. You can set it up so it fires twice per revolution and uses all four magnets in the stator. Just wind IN slot #1, OUT slot #6, IN slot #11, OUT slot #16, etc.... around and around until the slots are filled. Then connect the ends of the wires to the appropriately positioned commutator sections and you are good to go!

      You will still have to move the second set of brushes to pick up the recovery pulse. Other then that, you are done.

      You can start by rewinding with the same diameter wire and see how it runs. If it produces too much Back EMF, you may have to re-wrap it with fewer turns of a bigger wire. There really shouldn't be any other issues.

      These motors should work fine for these tests.

      Peter
      Peter Lindemann, D.Sc.

      Open System Thermodynamics Perpetual Motion Reality Electric Motor Secrets
      Battery Secrets Magnet Secrets Tesla's Radiant Energy Real Rain Making
      Bedini SG: The Complete Handbook Series Magnetic Energy Secrets

      Comment


      • Partially Correct

        Originally posted by n84dafun View Post
        Peter's quote on poste #170:
        "The final issue is to bias the Back EMF downward on the graph shown in the previous post. To do this, we have to run the motor on a higher voltage than it was or designed to do. So, for instance, if the motor was originally designed to run at 2000 rpm on 12 volts (as in the example above), then if we run it on 36 volts at 100 know it will produce 6 volts of Back EMF at that point. So, this is equivalent to running it in a position where 5/6ths of the voltage and current are getting through motor. This suggests that we should be able to recover up to 3/4ths of our applied electricity on our secondary brushes without interfering with our torque produ..."

        So it looks like back EMF depends on RPM and the reason it only spins 1000 rpms at 36v is because we have less windings for torque and speed. The 36v compensates for the reduced windings as a result of the modification.

        I think I'm starting to see the light on this one.

        Brian
        Brian and Everyone Else,

        In the example, 1000 rpm was the "target speed" under load. The motors will be capable of revving up to very high speed and will have to be loaded once they get going.

        Mechanical power is the cross-product of both torque and speed. In the normal configuration, the torque drops as the speed increases. In this arrangement, the torque is not falling off very fast as the speed increases, so the POWER rises rapidly as speed increases.

        The loading characteristics will be different, and the total power may be lower than the original motor, but the efficiency should be much higher, since our electrical input will be lower and now we have an electrical recovery, as well.

        More later,
        Peter
        Peter Lindemann, D.Sc.

        Open System Thermodynamics Perpetual Motion Reality Electric Motor Secrets
        Battery Secrets Magnet Secrets Tesla's Radiant Energy Real Rain Making
        Bedini SG: The Complete Handbook Series Magnetic Energy Secrets

        Comment


        • Originally posted by Peter Lindemann View Post
          Mark,

          20 slots is no problem. You can set it up so it fires twice per revolution and uses all four magnets in the stator. Just wind IN slot #1, OUT slot #6, IN slot #11, OUT slot #16, etc.... around and around until the slots are filled. Then connect the ends of the wires to the appropriately positioned commutator sections and you are good to go!

          You will still have to move the second set of brushes to pick up the recovery pulse. Other then that, you are done.

          You can start by rewinding with the same diameter wire and see how it runs. If it produces too much Back EMF, you may have to re-wrap it with fewer turns of a bigger wire. There really shouldn't be any other issues.

          These motors should work fine for these tests.

          Peter
          You've got me a little confused here Peter, let me see if I have this correct.
          1. You recommend winding around 5 rotor sections so my rotor pole will be a little wider than the magnet?
          2. Are you saying to wrap one time around sections 1-5 and then over to the other side and wrap one time around 11-16 and then back to one time around 1-5, back and forth. Or is ok to wrap one whole coil around sections 1-5 till full then over to the other side and wrap around 11-16 till its full. Will it make any difference as long as I count how many wraps and keep them equal. It would be easier and use less wire to use the 2nd method.

          Another thought here is would it be beneficial to wrap 4 coils (with 1 piece of wire) and repulse off all 4 magnets at once?

          Thanks for the guidance, sorry about all the questions.

          Mark

          P.S. Peter the way I read your description for winding above I'd be just "zig zaging" around the rotor and not actually making any coils per say.
          Last edited by Mark; 01-14-2011, 06:35 PM.

          Comment


          • Originally posted by Mark View Post
            You've got me a little confused here Peter, let me see if I have this correct.
            1. You recommend winding around 5 rotor sections so my rotor pole will be a little wider than the magnet?
            2. Are you saying to wrap one time around sections 1-5 and then over to the other side and wrap one time around 11-16 and then back to one time around 1-5, back and forth. Or is ok to wrap one whole coil around sections 1-5 till full then over to the other side and wrap around 11-16 till its full. Will it make any difference as long as I count how many wraps and keep them equal. It would be easier and use less wire to use the 2nd method.
            Another thought here is would it be beneficial to wrap 4 coils (with 1 piece of wire) and repulse off all 4 magnets at once?
            Thanks for the guidance, sorry about all the questions.
            Mark
            P.S. Peter the way I read your description for winding above I'd be just "zig zaging" around the rotor and not actually making any coils per say.

            Mark, Just wind the whole coil. Easy enough.

            @Anybody
            I am just about done and I have pictures and stuff of the progress. So this is MY BIG QUESTION, to help me finish.
            The power goes in one way as DC. We turn the coil ON. The power goes in the coil.
            Which way does Power come out? What leg of the coil should the diode be on.

            I got few more things to solder together and I am sure through trial and error I can find this if no one has a definitive plan, but I figure I would see first.

            Be back in a couple of hours....

            Matt

            Comment


            • Ok, here is my YouTube video of how I THINK I am to wind the motor. This is based on what I THINK everyone has told me. Thanks for that by the way guys! If this is correct Peter, please let me know and I'll leave it up so other people who don't have a clue (like me) can see how to do it.
              YouTube - 11Turion's Channel
              Last edited by Turion; 01-14-2011, 08:24 PM.
              “Advances are made by answering questions. Discoveries are made by questioning answers.”
              —Bernhard Haisch, Astrophysicist

              Comment


              • Still confused

                Originally posted by Mark View Post
                You've got me a little confused here Peter, let me see if I have this correct.
                1. You recommend winding around 5 rotor sections so my rotor pole will be a little wider than the magnet?
                2. Are you saying to wrap one time around sections 1-5 and then over to the other side and wrap one time around 11-16 and then back to one time around 1-5, back and forth. Or is ok to wrap one whole coil around sections 1-5 till full then over to the other side and wrap around 11-16 till its full. Will it make any difference as long as I count how many wraps and keep them equal. It would be easier and use less wire to use the 2nd method.

                Another thought here is would it be beneficial to wrap 4 coils (with 1 piece of wire) and repulse off all 4 magnets at once?

                Thanks for the guidance, sorry about all the questions.

                Mark

                P.S. Peter the way I read your description for winding above I'd be just "zig zaging" around the rotor and not actually making any coils per say.
                Mark,

                YES, the zig-zag winding is exactly what I am saying. Try it, you'll like it! This allows repulsion off of all 4 magnets in the stator. We are not trying to wind the rotor to create "poles" in the classical sense. All we want to do is put current carrying conductors in front of the stator poles, to produce the 90* off thrust vector, with the least Back EMF.

                Peter
                Last edited by Peter Lindemann; 01-14-2011, 08:55 PM.
                Peter Lindemann, D.Sc.

                Open System Thermodynamics Perpetual Motion Reality Electric Motor Secrets
                Battery Secrets Magnet Secrets Tesla's Radiant Energy Real Rain Making
                Bedini SG: The Complete Handbook Series Magnetic Energy Secrets

                Comment


                • Diagram

                  Originally posted by Matthew Jones View Post
                  Mark, Just wind the whole coil. Easy enough.

                  @Anybody
                  I am just about done and I have pictures and stuff of the progress. So this is MY BIG QUESTION, to help me finish.
                  The power goes in one way as DC. We turn the coil ON. The power goes in the coil.
                  Which way does Power come out? What leg of the coil should the diode be on.

                  I got few more things to solder together and I am sure through trial and error I can find this if no one has a definitive plan, but I figure I would see first.

                  Be back in a couple of hours....

                  Matt
                  Matt,

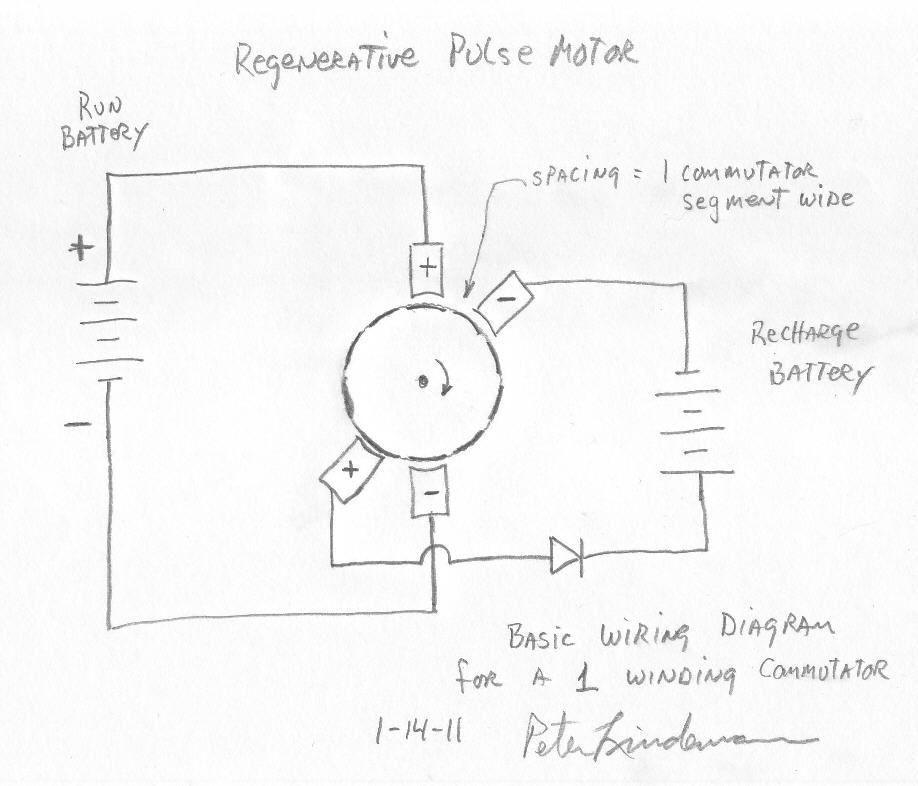
                  Here is a diagram I just whipped up for you. It shows the external wiring for a rotor that is set-up with one winding coming out to a set of opposite commutator segments.


                  Is this what you wanted?

                  Peter
                  Peter Lindemann, D.Sc.

                  Open System Thermodynamics Perpetual Motion Reality Electric Motor Secrets
                  Battery Secrets Magnet Secrets Tesla's Radiant Energy Real Rain Making
                  Bedini SG: The Complete Handbook Series Magnetic Energy Secrets

                  Comment


                  • Peter, I see that you are on. Did you have a chance to look at my YouTube video and see if I am winding correctly?
                    YouTube - 11Turion's Channel
                    “Advances are made by answering questions. Discoveries are made by questioning answers.”
                    —Bernhard Haisch, Astrophysicist

                    Comment


                    • Originally posted by Peter Lindemann View Post
                      Mark,

                      YES, the zig-zag winding is exactly what I am saying. Try it, you'll like it!

                      Peter
                      LOL, ok I'll try it. It doesn't seem like that would work! Just weaving back and forth thru the slots with no actual coils per say.

                      LOL, still want to make sure I have this right. After winding the rotor if I'm looking down the shaft of the rotor I would see >< with copper wire going up and down over the symbols. And if I looked at the other side without turning it I would see the same thing except the symbols would be rotated 90 degrees with the wires running horizontal. Is that right, the wire would have the appearance of a 4 bladed fan, 2 blades on each side. One side the blades horizontal and the other side the blades perpendicular?

                      Sorry to keep bugging you just want to get it right.

                      Mark

                      Comment


                      • Torion,

                        You got it The only thing is you need to tie your start piece on the other end where the commutator is.

                        Comment


                        • Correct!!! YEAH!

                          Originally posted by Turion View Post
                          Peter, I see that you are on. Did you have a chance to look at my YouTube video and see if I am winding correctly?
                          YouTube - 11Turion's Channel
                          Turion,

                          Yes, that is what I am suggesting. So, that will be your first, discrete winding. Fill the slots up and terminate them on the proper commutation segments that are just engaging the brushes when the windings are in the middle of the stator poles.

                          You can then wind the second discrete winding 90* off from that one. This will allow the motor to have 4 power pulses per revolution, but each winding will only be carrying current twice per revolution. This should give the motor plenty of power and the windings plenty of time to stay cool.

                          The commutator and brush diagram I made for Matt should work for your motor also.

                          Peter
                          Last edited by Peter Lindemann; 01-14-2011, 09:08 PM.
                          Peter Lindemann, D.Sc.

                          Open System Thermodynamics Perpetual Motion Reality Electric Motor Secrets
                          Battery Secrets Magnet Secrets Tesla's Radiant Energy Real Rain Making
                          Bedini SG: The Complete Handbook Series Magnetic Energy Secrets

                          Comment


                          • Originally posted by Peter Lindemann View Post
                            Turion,

                            Yes, that is what I am suggesting. So, that will be your first, discrete winding. Fill the slots up and terminate them on the proper commutation segments that are just engaging the brushes when the windings are in the middle of the stator poles.

                            You can then wind the second discrete winding 90* off from that one. This will allow the motor to have 4 power pulses per revolution, but each winding will only be carrying current twice per revolution. This should give the motor plenty of power and the windings plenty of time to stay cool.

                            The commutator and brush diagram I made for Matt should work for your motor also.

                            Peter
                            By "when the windings are in the middle of the stator poles" do you mean centered ON the two magnets or BETWEEN the two magnets? I thought it was between the two magnets??
                            “Advances are made by answering questions. Discoveries are made by questioning answers.”
                            —Bernhard Haisch, Astrophysicist

                            Comment


                            • Now I'm Confused

                              Originally posted by Mark View Post
                              LOL, ok I'll try it. It doesn't seem like that would work! Just weaving back and forth thru the slots with no actual coils per say.

                              LOL, still want to make sure I have this right. After winding the rotor if I'm looking down the shaft of the rotor I would see >< with copper wire going up and down over the symbols. And if I looked at the other side without turning it I would see the same thing except the symbols would be rotated 90 degrees with the wires running horizontal. Is that right, the wire would have the appearance of a 4 bladed fan, 2 blades on each side. One side the blades horizontal and the other side the blades perpendicular?

                              Sorry to keep bugging you just want to get it right.

                              Mark
                              Mark,

                              I think you understand just fine. You just haven't ever thought of winding a motor this way. Just to clarify, here is another description.

                              Starting at the commutator side, lay your wire into slot #1. Coming out of Slot #1, lay the wire along the edge of the rotor until you get to slot #6. then enter slot #6 and come back to the commutator side again. Then go over to slot #11 and lay the wire down slot #11 and come out on the back side again. Then go over to slot #16 and come back over to the commutator side. Then, on to slot #1 again.... around in that pattern until the slots are filled. This is for your 20 slot rotor. The ends of the wires will terminate on two commutator segments that are 180* away from each other when the wire in the slots are sitting in the middle of the stator poles.

                              You understand the rest.

                              Peter
                              Peter Lindemann, D.Sc.

                              Open System Thermodynamics Perpetual Motion Reality Electric Motor Secrets
                              Battery Secrets Magnet Secrets Tesla's Radiant Energy Real Rain Making
                              Bedini SG: The Complete Handbook Series Magnetic Energy Secrets

                              Comment


                              • Centered ON

                                Originally posted by Turion View Post
                                By "when the windings are in the middle of the stator poles" do you mean centered ON the two magnets or BETWEEN the two magnets? I thought it was between the two magnets??
                                Turion,

                                I mean CENTERED ON (in the middle of) the stator pole faces.

                                Peter
                                Peter Lindemann, D.Sc.

                                Open System Thermodynamics Perpetual Motion Reality Electric Motor Secrets
                                Battery Secrets Magnet Secrets Tesla's Radiant Energy Real Rain Making
                                Bedini SG: The Complete Handbook Series Magnetic Energy Secrets

                                Comment

                                Working...
                                X